Monday, April 15, 2013

Widening the Back Neck

As mentioned previously, I manually widened the back neck opening on my PMB pattern by 'sliding' the neckline laterally.  I did not rotate the shoulder dart to the neck.


Basically, using the PATTERN EDITOR portion of PMB5, I drew a circle with a 0.25" radius at the CB/neck point. 

  • When drawing this circle, I clicked on the CB/NECK point, then moved the mouse laterally, typed in 0.25 and hit ENTER. 
  • This created the circle but more importantly, it also put the X-construction point of the circle on the right side of the circle...at the 3 o'clock location...precisely 0.25" away from the CB line.
Next, I SELECTED the entire back neck (but NOT the new circle) as well as the medial shoulder segment and the medial dart leg.

I clicked on the CB/neck point, then clicked on the X-construction point of the circle.  This moved the selected items laterally by 0.25".


At this point, there is a 0.25" gap in the neckline at CB.
I drew a new line to fill that gap.

Also, the dart legs now cross...so I found the midpoint between the ends of the legs (Draw LINE between the tips, then, select line, Locate Midpoint) and drew new dart legs to connect the shoulder to the new dart tip (which is the MIDPOINT between the crossed legs).

Here you can see the difference between the original and the new patterns:
You can see that the shoulder dart is smaller (red) and the neck is wider (red) than the original patttern (green).
Because I didn't ROTATE part of the shoulder dart to the neck, the NK/Shoulder Point did not go any higher than it was...it just moved laterally...just as it would have been drafted if the neck measurement was wider.

Monday, April 8, 2013

Wedding Dress Post-Mortem

Well, the wedding is over!  Now it is time to look at the game films and determine what can be improved for next time!    :-)
 
First, let me say, this dress performed brilliantly!  It made a great impression, was comfortable to wear, and allowed freedom of motion.  Plus, it looked cool when I twirled!


But the fit wasn't perfect.  I knew as soon as I put the sleeves in that I had made the shoulders too wide.  Rats!

I didn't put sleeves into the trial muslin...and in the back of my mind, I could hear that little voice telling me to do so.  But I was in a rush (as always) to get this done.  So I confidently skipped that step.  After all, these are tiny little cap sleeves.  I knew that *if* they weren't 'right' they would still be 'good enough'...as in, they wouldn't restrict arm movement because they were so short...so I proceeded with abandon! 

Well, not quite 'abandon'...I did have to rip out the first sleeve I set in, as I mentioned in my last post.

As soon as I got these sleeves in and tried the dress on, I could feel them.  Not painful...just an awareness.  I could feel the tightness of the sleeve's hem...it needed to be a wider sleeve.  The armhole was VERY close to my body!

If you look at the BACK armhole and sleeve, you can kinda see a fold of excess fabric at the ah seam.

And if you look at the FRONT armhole, you can imagine that that ah seam is right up next to my arm in front...no room for moving the arm forward.

Don't get me wrong...I COULD move my arm forward (and did...I danced all night!)...but I could feel the armhole at first.  After a while, I noticed nothing...it was comfortable.  But it wasn't 'right'.

I know from these pictures it would appear that I carried a glass of wine the entire time, but, truely, that was NOT the case!

I put it down every now and then...
While it looks like I am scolding someone, in reality I was not.  I was challenging my SIL to dance!  ...silly...

But see how the back of the sleeve has that fold?  If that armhole seam was just a little farther up on the body, the sleeve would have been wider (so, the hem wider = less constricting) and the fold would disappear (I think).

I used a Back Shoulder Width of 17"...my body actually measures 16.75" between the arm creases WHEN MY HANDS ARE CLASPED IN FRONT...see Helping Measurements if you don't remember.

But if I measure across the TOP of the shoulders, it is not that wide.  I have always struggled with getting the shoulder widths (and thus, the armholes) 'just right'.

I DID use the ARMHOLE SHAPE TOOL to lower the placement of the notch on the back armhole so that the segment ABOVE the notch matched my body's armhole measurement...that is, from my Shoulder Point to the top of the crease where arm meets body.  My body measures 5"...so I lower the ah notch until that upper segment also measures 5". This way, the armhole begins to curve where it should for MY body. That was explained in the last post.

As I said, I DID not lower the FRONT ah notch to force the upper segment of the front ah to match my body's measurements...I felt like that made the armhole much too scooped.  I am now rethinking that choice. 

Next time, I WILL lower the front armhole notch until the upper segment is 4.25"...just like my body.  I think this matters!

As you can see here, there are lots of wrinkles intoduced when the arms are extended. The bodice is forced to move up off the arms and onto the body...so the arm can move.

Of course, no one but ME noticed these things...everyone kept telling me how good it looked and how perfectly it fit.  I just kept my mouth shut and DID NOT point out every little flaw!
(Can you believe that, Marilyn?)    :-)

Guess what?  Those dreaded diagonal wrinkles that I ALWAYS have in back are there again!  Sigh!  I must reduce that Back Shoulder Slope measurement AGAIN!!! 

For next time, in addition to making the shoulders (front and back) more narrow, I will reduce the BSS by .25" *AND* I will also lower the armhole by an additional 0.25".  Hopefully, that will pull those wrinkles up and out.

I know this is a dark picture...I take what I am given! 
I am just thankful to HAVE some images where I CAN do this post-mortem!


I am dancing in this image, so my body is twisted...but you CAN see the wrinkles a little.  You can also see how the armhole seam is right there ON the back arm crease...although the reason I wanted sleeves in my dress in the first place is to HIDE that back arm crease, which I find is one of my less-attractive body parts!

Ok, now that we have established that the shoulders, front and back, are too wide (and the back shoulder slope too long), there is one more thing to notice:  the neck width.  You might need to scroll back up to that first image to see this.

I used a NECK WIDTH setting of 0.5"...which means this neckline should be .5" away from my neck.  Since I am wearing a necklace, you can see that the dress neckline is WAY farther away from my necklace chain than 0.5"! 

That is a BIG DEAL.

And it explains alot.

The length of the shoulder seam on this dress is 'right' for me. 
The problem is, this shoulder starts too far from center!

PMB version 5 removed the Shoulder Length measurement, which, in earlier versions, could be used (in combination with the Front Shoulder Width measurement) to determine the width of the neck opening on the front pattern. 

In earlier versions, the front neck opening could be a different width than the back neck opening (which was determined by the NECK CIRCUMFERENCE measurement). 

But in V5, front and back neck openings draft equally...and the NECK CIRCUMFERENCE measurement controls this width.

I pulled out an old pattern...actually, it was the pattern for the wrap-top I wore to the rehearsal dinner!
I'll show you: 


This top was made back in 2008...using Version 3.  The neck width used on this one was also 0.5"...but as you can see, it is much closer to MY neck!

Ok, yes, there is wine in this picture also...but REALLY, I don't have a problem!   :-)

But back to the clothing...

This top isn't perfect...the bust darts are too low for one thing!...but like most of the things I make, it is wearable and looks pretty good.  So, when I compared the pattern for this top with the one used to make the wedding dress, I kept that in mind.

Ok, here is the basic torso pattern I used to create the MOG dress...highlighted in RED.   The yellow/greenish pattern is the one used to create the Teal Satin Wrap top (in 2008).

If you look at the NECK WIDTHS, you will see they are pretty much the same.

But look at the difference in SHOULDER WIDTHS on these two patterns! 


....and the TEAL one fits just fine across the back...

Just look!

While I am not 'posing' for the picture, you can see that I have plenty of mobility...there is no stress across the back. 

This Teal Top was drafted with a Back Shoulder Width of 15.5"...not the 17" that I used on the MOG.

There was no back shoulder dart to sew...a tiny bit of ease only.

BUT...at that time, so that I would NOT have a big dart, I manually rotated this pattern's back armhole outward (pivot point = SHOULDER POINT)...to give more ease at the level of the lower armhole area. 


OK, so now...look at the comparison of the FRONT patterns. 

The RED is the block I used to create the MOG dress.

The BLUE is the 2008 Teal Wrap top pattern.

Compare the front neck widths.

With center fronts aligned, the MOG pattern has a wider neck opening than the Teal Wrap pattern....measure straight across from neck point to CF (if it were extended upward).

Now, this front neckline on the Teal top drafted narrower than the back neckline on the Teal top...because I could draft that way using V3.


I used a NECK CIRCUMFERENCE measurement of 14" for the Teal Top...in V3.

For the MOG dress, I used a NECK CIRCUMFERENCE measurement of 13.5"...in V5.

Even with the smaller NECK measurement, the FRONT neck in V5 drafts wider than the neck of the V3 one!

But remember, in my last post, I said I had to WIDEN the back neck so that it would be wider than the front neck?  I can now see that the back neck was the one that was the right width!  It was the FRONT NECK that was too wide...the back wasn't too narrow!

But since I was using that very wide BACK SHOULDER WIDTH measurement (17") and getting a large back shoulder dart, I saw widening the back neck as an opportunity to reduce that dart...it didn't even occur to me that the front neck width was actually the problem!

So, FOR NEXT TIME...I will reduce the NECK MEASUREMENT from 13.5 to 12".
This will draft a neck that matches the FRONT of my old patterns.

I will use a FRONT SHOULDER WIDTH of 15 (instead of the 15.5" used this time).
I will use a BACK SHOULDER WIDTH of 16 (instead of the 17" used this time).
This is a 0.5" reduction in FRONT shoulder width, but a 1" reduction in BACK shoulder width.  This will result in a smaller back shoulder dart.

At right, you can see the original MOG pattern in RED.  The Blue/green patterns are the 'NEXT TIME' choices.

The front neck opening is narrower...but the length of the shoulder seam is the same as before...as if the shoulder was just 'shifted' medially. 

The front armhole is moved inward .25" and allowed to scoop lower (this is the questionable part!).  But the upper ah segment matches my body's 4.25" measurement!

I lowered the overall armhole DEPTH another 0.25"...for an ah depth setting of 0.5".

ON THE BACK, you see that the new back neck (green) is narrower than before.  But, remember? I said it was the back neck width that was actually correct before I widened it!  So, again, I will manually widen it to eliminate some of the back shoulder dart width...I will restore the back neck to the width it was before...on the original MOG! 

So, basically, I am using a smaller-than-real neck circumference measurement to draft the desired width of the FRONT NECK, then I will widen the back neck using some of the shoulder dart.

The back shoulders will be narrower across the top of the pattern.
The lower armhole will move inward 0.25", as well as downward 0.25".
The back shoulder is more sloped on this new one...as if the back armhole was 'shifted' downward on the pattern by 0.25".  I am hoping this is enough to eliminate those diagonal pulls!


Ok, so here is how the NEW (next time) pattern...in RED...compares with the pattern for the TEAL top.  With center fronts aligned, the new neck width is almost the same as on the old one...close enough.

The Front armhole is very different...we'll see how this works out.  Might be wonderful!

Note--The waist is higher on ALL these newer patterns (including the original MOG) than it was on the TEAL top.

On the BACK, the NEW (next time) RED pattern has a narrower neck width...but this is ok, because there is still a back shoulder dart to steal from!  I will manually widen this neck.

The new pattern has a slightly more sloped back shoulder than the TEAL one...this is desireable.

Since the TEAL one's back armhole was manually rotated outward, this new back armhole compares favorably, with no rotation needed.


And on both front and back, you may notice the difference in width at sideseams...
...the TEAL top used a 41.5" bust measurement with 3" of ease. 
...the MOG (and this new version) used a 42" bust with ZERO ease!


Gosh, I was gonna show how I widen the neck, but perhaps that needs to be a separate post! 
Thanks for reading!


Friday, March 29, 2013

Zero-ease Torso Block

A friend asked about the measurements and settings I am using now to sew this dress.  I couldn't really give a short answer.  I had to do some research!

So...I guess I should back up a bit and start this story from the beginning.

After trying on a gazillion RTW dresses and being made to feel that my body is sub-optimal deciding I could do better, I decided to sew a dress.  I pulled out that red crinkle sheath and tried it on for evaluation.  I didn't trust the shoulder changes that I had made because that fabric was, after all, a crinkle rayon!...it has 'give'!  But the need to raise the waist level and increase the bust cup were undeniable.  So I set about creating a new chart and pulled out some fabric to test it.

I used a striped polished cotton and cut a ZERO- ease torso block from it. 
I put a zipper in the back seam. 
No sleeves yet.
Well, as you can see by the pattern, there are some suspicious areas!
I used one waist dart in front and back.

I chose an F bust-cup.  Remember?...in the red crinkle sheath discussion, I decided that I needed to go up, but wasn't sure whether to go to E or F.  Since this was to be very fitted, I decided the F was the right choice.***Spoiler alert!!!  This decision will come back to haunt me!


Look at how sloped that back shoulder is!  Way too sloped.  This was one of the changes that I made based on the red crinkle sheath that I was REALLY suspicious about...and it turned out to be way too much slope.

But at this point, I couldn't tell that, though, because I couldn't get this shell zipped over my hips!  I had used my hip measurement, taken at hip level.  But my body is larger at high-hip level!

Look at the hips on that pattern!  Very narrow.  But my hips ARE fairly narrow...
I decided to add some hip ease, then move the SIDE/WAIST and SIDE/HIP points so that ALL the ease I was adding would be in the back.  It seemed like that was were it was needed.

I took the shell apart and printed a new back pattern. I scabbed on some fabric to the sides of the back and re-cut it...then resewed it.  Bad!

I won't go through every detail of every iteration, but I did learn some things as a result of this exercise.
  • For one thing...I need for my waist darts to be very long.  These were way too short in the above pattern.  In front, my darts should be 8" long below the waist.  In back, the dart should be 7" long below the waist. 
  • My new hip depth is 9" since the waist was moved upward.
  • I should NEVER move the SIDE/WAIST and SIDE/HIP points on my torso garments!  I need to have the same amount of dart uptake in front as in back...and that amount is 2" per pattern.*
  • *In order to get waist darts that are large enough (to give me that 2" per pattern), I have to reduce my real WAIST MEASUREMENT by 2"...then manually add .5" at each side/waist to blend that sharp waist indention that PMB creates.
  • I should NEVER draft with 2 waist darts and only sew one UNLESS I am doing that front and back (maybe). I have to keep the uptake equal, F and B.
  • My front WAIST DARTS look better when I make the BUST DART HORIZONTAL setting a smaller number...4"...and increase the UPPER FRONT DART LENGTH SETTING to cause the dart to end farther from the bust point.  I chose 2"...This keeps the dart tip of the side bust dart in about the same place as before, but allows the waist darts to be closer to the center of the body for a more flattering look.
  • I use a ZERO setting for the UPPER BACK DART LENGTH SETTING. 
  • I use 3.5" for my  FIRST BACK DART POSITION setting....not sure this is set in stone yet.
  • To get under-bust contouring, I should sew the front waist darts straight up from waist for about 3.5"...then begin to curve in an "S" shape  before coming to a point.

Now, here is a VERY important lesson learned...I CANNOT use ZERO hip ease if my largest circumference is at the HIGH HIP ...especially when I also use long torso/waist darts!  I would either have to use the HIGH HIP MEASUREMENT as the hip measurement or add ease.  I chose to keep the measurement as is and add ease (for now).

I had to increase the hip ease setting to 3.5" to have enough width in the pattern to cover the high hip and  replace what I was removing in the torso/waist darts.  So, to create a "ZERO-EASE" shell, I  STILL have to add hip ease so I can dart it out with the long waist darts!  My body needs the interior darting for shape...it needs a wider pattern with more interior darting.

Eventually, I decided to go with 4.5" hip ease...this ease setting left me with 1" of actual hip ease, I think.  Once I went to the actual dress, I also added a tiny bit of ease to the waist as well.

Here is what my pattern looks like once I make all the right choices:

Notice the difference in the size of these waist darts as compared to the tiny ones in the original pattern (way up in this story).  The back shoulder angle is less steep now,**more about that later.

BTW, I raised this hem up a bit above hip level for the dress style...that is why it looks shorter.

***And, I DID have to make manual changes to the back neck and shoulder dart!***
Because PMB5 will not draft a back neck opening that is wider than the front neck opening,
I must manually slide the back neck over and reduce the size of the shoulder dart
I'll show that  in a future post.

Ok, here is a little about the fitting:

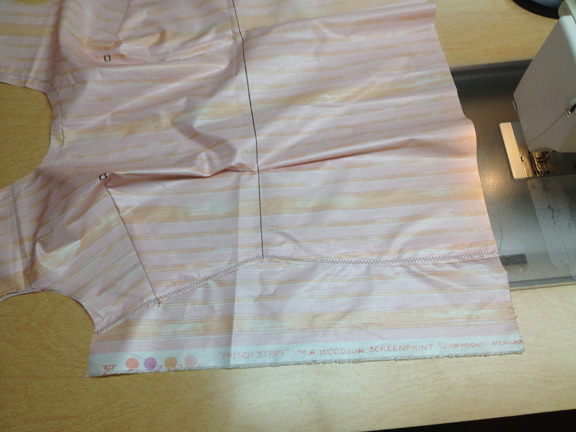
As you can see on the shoulder and armhole of this FRONT piece, I scabbed on some fabric at the very tip of the shoulder and have drawn marks where the armhole will be trimmed.  This is so I can continue using the same fabric piece without starting over...the next pattern has a wider shoulder, but I scooped the armholes by using the ARMHOLE SHAPE TOOL.

 
Below, you can see where I scabbed on a chunk of fabric so I could recut the front and add to the width of the hips and waist, according to the next pattern to be tried.

 
On my dress form, I hung a weighted string from the neck area, making sure it crossed the shoulder at the SHOULDER POINT.  This way, I could observe the side seam.
Notice...although it touches the string at the underarm and almost touches at the hip, the string is far behind the sideseam at the waist. 
Or, rather, the sideseam swings too far forward at the waist!
 
This tells me that my DART UPTAKE (and side seam position)  is not right...the distribution of the waist/torso dart uptake  is wrong.  The front darts are taking out too much fabric and the back darts not enough...and/or, I have placed the sideseam incorrectly. 
 
 
This was one of the iterations where I had tried moving the S/W and S/H points forward to allow the back to have more fabric over the bum.  Bad idea, but now I know!  Eventually, I realized that my darts much be equal front and back and my side/waist and side/hip must be at the zero position.
 
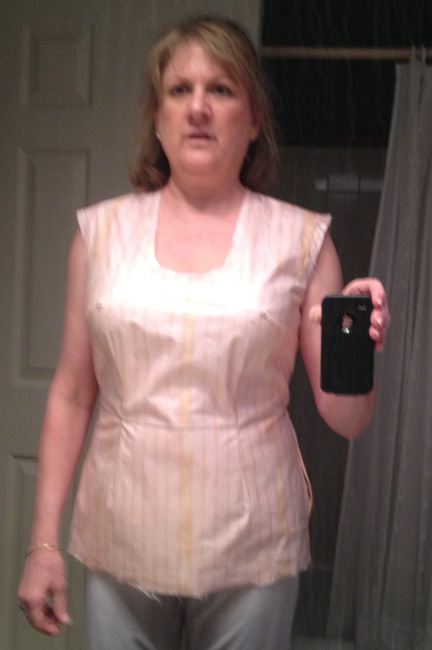
My pictures are awful...I know.  Shaky cell phone camera in poor lighting reflected in a dirty mirror.  But perhaps you'll get the idea--
 

The bust dart was too high and had an ugly ending.
The front waist darts were too far 'out', creating a plateau on my belly!


Funky dart tip...plus, look at the diagonal wrinkles behind that arm!

 
To eliminate those diagonal folds in back, I reshaped the back armhole using the ARMHOLE SHAPE TOOL.  First, I went back to my HELPING MEASUREMENTS as determined before.  I had measured my body from the shoulder point down the back armhole to the V where the arm meets the body...this measures 5".  I decided that the upper section of my back pattern also needed to measure 5", so I used the DOWNWARD ARROW to move the back  notch down until the upper section of that armhole measured 5".  This caused the back armhole to become more scooped.
 
 
I also increased my bust measurement by 1"...that is why the RED pattern is .25" wider at underarm level.  But the important note here is the lower notch on the RED one...the upper section of the back armhole seamline is now 5" long (between shoulder and notch), which matches my body.  The arc of the armhole will start where my underarm actually is!
 
Here is an attempt at photographing that back armhole.  There are 5/8" seam allowances still on the armholes...but the wrinkles were better.  In hindsight, I also think I should have decreased the Back Shoulder Slope measurement by a little, as well as make the Back Shoulder Width a bit smaller, because, after all, this is a zero ease garment...I might have too much ease in the back shoulder.  Hindsight.
 
 
I DID NOT make the same change to the front pattern.  That is, I did not lower the front notch so that the upper part of the FRONT ARMHOLE would match the measurement on the front of my body.  I tried, but in PMB, that causes the lower arc of the front armhole to become WAY too scooped.  So I just lowered it as far as looked 'right'.
 
 
Remember, the bust dart was too high.
So I lowered it.
Then I raised it up a little. 
Then lowered it again...
 
 
I stopped it farther from the bust point.

 
I moved that dart up and down, in and out...

 
...but still, the awful fold at the end of the dart was present!

 
In the end, I FINALLY realized it was the BUST CUP! 
I had used an F cup...
What if I only needed an E?
 
So I sewed a pleat across the whole front to similate how it would be had I used an E cup...

Better! 
I hadn't thought the front waist was too low, but once it was higher, it DID look better! 
(Using an F-cup also adds 3/8" more front length.) 
Moving the front waist up that 3/8" (by reducing the cup size) was actually an improvement!
 
I also considered that perhaps a single side bust dart would not ever sew smoothly. 
I am hoping that will not be the case!
 
 
I KNOW the darts look awful in this...I would normally sew 4 front torso darts instead of only 2, as well as 4 back torso darts...but on this shell, I was going for speed not beauty.
 
 
At this point, I decided I was close enough and started designing the pattern for the actual dress.
 
NOTE...I decided to raise the front neckline just a little for the dress....this one still has a 5/8" seam allowance on it and seems like a good depth, so I raised it for the real thing.
 
I guess I should post some measurements and settings, although I am not entirely sure what I should post!  I made more changes based on sewing the dress and would probably make the shoulders even more narrow!  See, I go back and forth on the best way to handle that 'V' that forms at my shoulder when the front and back are sewn together at the shoulder:
If you zoom in close, perhaps you can see the inward-V that forms there.
It will pull the tip of the sleeve up into it, creating a point.  I hate that!

So, I draft with the shoulders extra-wide, then use the ARMHOLE SHAPE TOOL to bump the notches INWARD on both front and back.  I have also drawn an ARC to smooth the upper armhole, creating a nicer transition from front to back.

I have tried using a narrower shoulder measurement, but forgetting to manually extend the shoulder tip to prevent the V is a problelm for me!  By doing it this way (drafting wide and trimming), if I cut out the garment BEFORE I remember to make a modification, I am still ok...I don't have to ADD anthing to fill in the little V...if I forget to scoop out around it, I will see it as soon as I set the sleeves...and can still fix it. 
This is still not set in stone!
 
 
Ok, if you are still reading, this is what I ended up deciding was my "zero ease" block.
 
HTH!
Patricia
 

Style Name:    130320_sleeveB_4_MOG_DRESS

Chart:    Trish_EcupShrtr _130306G_WA

Program: Boutique x5

Date:     3/20/2013


Garment Type:                  Sheath

Body Shape:                      All

Difficulty Level: All


Style:                                   Classic

Closure:                              Back Zipper


Front Neckline:                Scoop

Back Neckline:                  Jewel

Front Neckline Depth:     5.5

Back Neckline Depth:      0.5

Neckline Width:                0.5

Neckline Point:              0

Front Neckline Shape Up:              0.7 clicks

Front Neckline Shape Right:          -0.3 clicks


Front Darts:                       Side

Back Darts:                        Shoulder

Front Torso:                       1

Back Torso:                       1


Dart Override:                   0

Bust Pt Vertical:                              10.5

Bust Pt Horizontal:                          4

Upper Front Dart Length:              2

Upper Back Dart Length:               0

Lower Front Dart Length:              8

Lower Back Dart Length:               7

Back Shoulder Dart Length:          3

First Back Dart Position:                3.5


Sideseam Shape:                             Fitted

Armhole Depth:                               0.25

Side/Arm Point:                               -1.25

Side/Waist Point:                            0

Side/Hip Point:                               0


Cf/Extension:                                   0

Cb/Extension:                                  0


Shoulder Pad:                                   0

Shoulder Length:                             0


Sheath Length:                            Knee

Finished Cb/Hem Length:              22


Hemline Sweep:                         Straight

Hemline Shape:                          Straight


Hip Depth:                                         9


Sleeve Style:                                     Set In

Sleeve Underarm Seam:                Straight

Sleeve Hemline Shape:                   Straight

Sleeve Length:                                 Short

Sleeve Cap Ease:                             0.47

Sleeve Underarm Length:              2

Sleeve Overarm Length:                6.939

Sleeve Hem Circumference:         12

Sleeve Elbow Depth:                       10

Sleeve Elbow Circum.:                    10

Sleeve Cap Height Adj:                   -1

Sleeve Hem Width:                          1

Front Armhole Shape Down:         -0.4 clicks

Front Armhole Shape Right:          -0.2 clicks

Back Armhole Shape Down:          -1.1 clicks

Back Armhole Shape Left:             -0.2 clicks


Seam Allowance:                             0.625

Hem Allowance:                               2

Facing Width:                                   2


Chest Ease:                                       0

Waist Ease:                                       0.5

Hip Ease:                                           3.5


Body Measurements

Side of the Body:                             Left


Chest Circumference:                     42

Back Shoulder Width:                     17

Neck Circumference:                      13.5

Natural Waist:                                  31

Hip Circumference:                         39

Crotch Length:                                 29

Height:                                               66

Weight:                                              143

Bra Cup Size:                                    E

Center Front Length:                      14

Front Shoulder Width:                    15.5

Front Shoulder Slope:                     17

Center Back Length:                       15.5

Back Shoulder Slope:                      17

Bicep Circumference:                     12

Bust Radius:                                     4.5

Notes:                 

new- increased BSW by 1 and BSS by 1

and .5" to FSW

--reduced waist to 31


E cup

Use -1 cap height

Lower armhole depth .25


Free Hit Counter