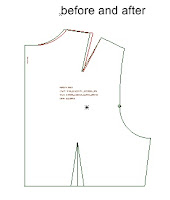
Basically, using the PATTERN EDITOR portion of PMB5, I drew a circle with a 0.25" radius at the CB/neck point.
- When drawing this circle, I clicked on the CB/NECK point, then moved the mouse laterally, typed in 0.25 and hit ENTER.
- This created the circle but more importantly, it also put the X-construction point of the circle on the right side of the circle...at the 3 o'clock location...precisely 0.25" away from the CB line.
I clicked on the CB/neck point, then clicked on the X-construction point of the circle. This moved the selected items laterally by 0.25".
At this point, there is a 0.25" gap in the neckline at CB.
I drew a new line to fill that gap.
Also, the dart legs now cross...so I found the midpoint between the ends of the legs (Draw LINE between the tips, then, select line, Locate Midpoint) and drew new dart legs to connect the shoulder to the new dart tip (which is the MIDPOINT between the crossed legs).
Here you can see the difference between the original and the new patterns:
You can see that the shoulder dart is smaller (red) and the neck is wider (red) than the original patttern (green).
Because I didn't ROTATE part of the shoulder dart to the neck, the NK/Shoulder Point did not go any higher than it was...it just moved laterally...just as it would have been drafted if the neck measurement was wider.


2 comments:
Hi Trish,
This might be a dumb question because I am not as familiar with the program as you are.. but now that you went into PE and adjusted your Back neck width.. will the program draft you the correct facings and collar (if you selected one?)
Thanks for the information
Rosemary
Rosemary, NO...the collar or facing would also need to be modified by hand. But that is a pretty easy alteration...just put the collar or facing pattern piece 0.25" away from the fold of the fabric when laying out the pieces...or, BETTER STILL, add that .25" to the CB of the pattern so you won't forget!
Post a Comment