I didn't want to go with the expected hot chili peppers or 'south of the border'- type imagery, but also didn't think using candles with actual flames was a good idea either. The idea that kept coming into my mind over and over was that of flaming pincushions. Eventually, I decided to go with that.
To begin, I needed a pattern. I went to WILD THINGS, a free pattern-drafting program by Wild Ginger for making accessories. I chose the crown of the BASEBALL HAT pattern to make my tomatoes, drafting the pattern over and over with various measurements until I finally got one that seemed like the right size. I sewed about 6 or 7 prototypes in a stash fabric before I was satisfied with the size and shape. Then I went to the red satin.

I began sewing the sections together, but soon decided I should add sewn eyelets to the sections before sewing them all together. That way, I could insert giant pins into the pincushion without causing the red satin to run or pull. I just used a piece of paper napkin as a stablizer under the fabric as I sewed the eyelets...it pulled right off.
Once the tomatoes were sewn together, they needed a base. So I went out to the garage resource center and pulled out some 1/2" plywood and began cutting. Using the circular saw, I first cut strips, then cross-cut them into squares.
 I had used a ruler to draw lines plus a template to draw circles onto the plywood, so I would know where to cut.
 Next I took the squares of wood to the band saw and cut the circles free-hand. Precision wasn't totally necessary here!
 Back in the sewing room, I pushed a plywood circle into the bottom opening of each stuffed tomato and used an electric staple gun to secure the fabric to the wooden base....like doing upholstery work!
 Here you can see the stuffed tomatoes. The pattern I used is there in front, as well as some of the ideas I was working on for embellishment.
 Once the tomatoes were stuffed and stapled, I used the green yarn to wrap around them, like a real tomato pincushion. The little 'blossom end' was cut from green felt.
I bought some plastic skulls at Michael's...it was before Halloween...and I used craft paint to paint flames in their eye sockets. You can see the difference here...before and after flames.
While this seemed like it would be easy, it was more difficult that I thought! I had to use a tiny paintbrush with very few bristles! I also had to keep reminding myself that precision wasn't necessary...these were for a centerpiece that might end up in someone's garbage!
 These tomato pincushions needed LARGE pins. I used some bamboo skewers and spray painted them with chrome paint. Since I wanted to put balls on top, I grabbedt a variety-pack of Sculpy clay from my stash and began mixing colors to make the balls. As each one was formed, I pushed a painted skewer into it and stood it up in a thread spool to allow the clay to dry.
 To harden, this clay must be baked in an oven for 15 minutes at 250 degrees. So I put a cooling rack on a jellyroll pan and placed the pins on their sides on the rack, with the balls hanging off the side (so they would stay round) and baked them.
 Then I cut it into a flame shape, angling the flames toward one end, rather than making them stick out to the sides. I wanted to stitch these flames to a floral stem (wire) to make a trail of flames running up one side of the tomato, so the flames needed to 'reach upward' as they climbed the side of the tomato.
 This seemed to work better than anything else I had tried, so my plan was solidified...I could proceed.
 I painted longer strips of the organza, to make many more flames!
 The boo-boo bunny is made from a white washcloth which holds a plastic Easter egg. Open the egg and put in an ice cube. When the ice cube melts, it is contained and doesn't drip all over the place. I just left the egg open, so I could touch the actual ice if needed. And, of course, it was needed!
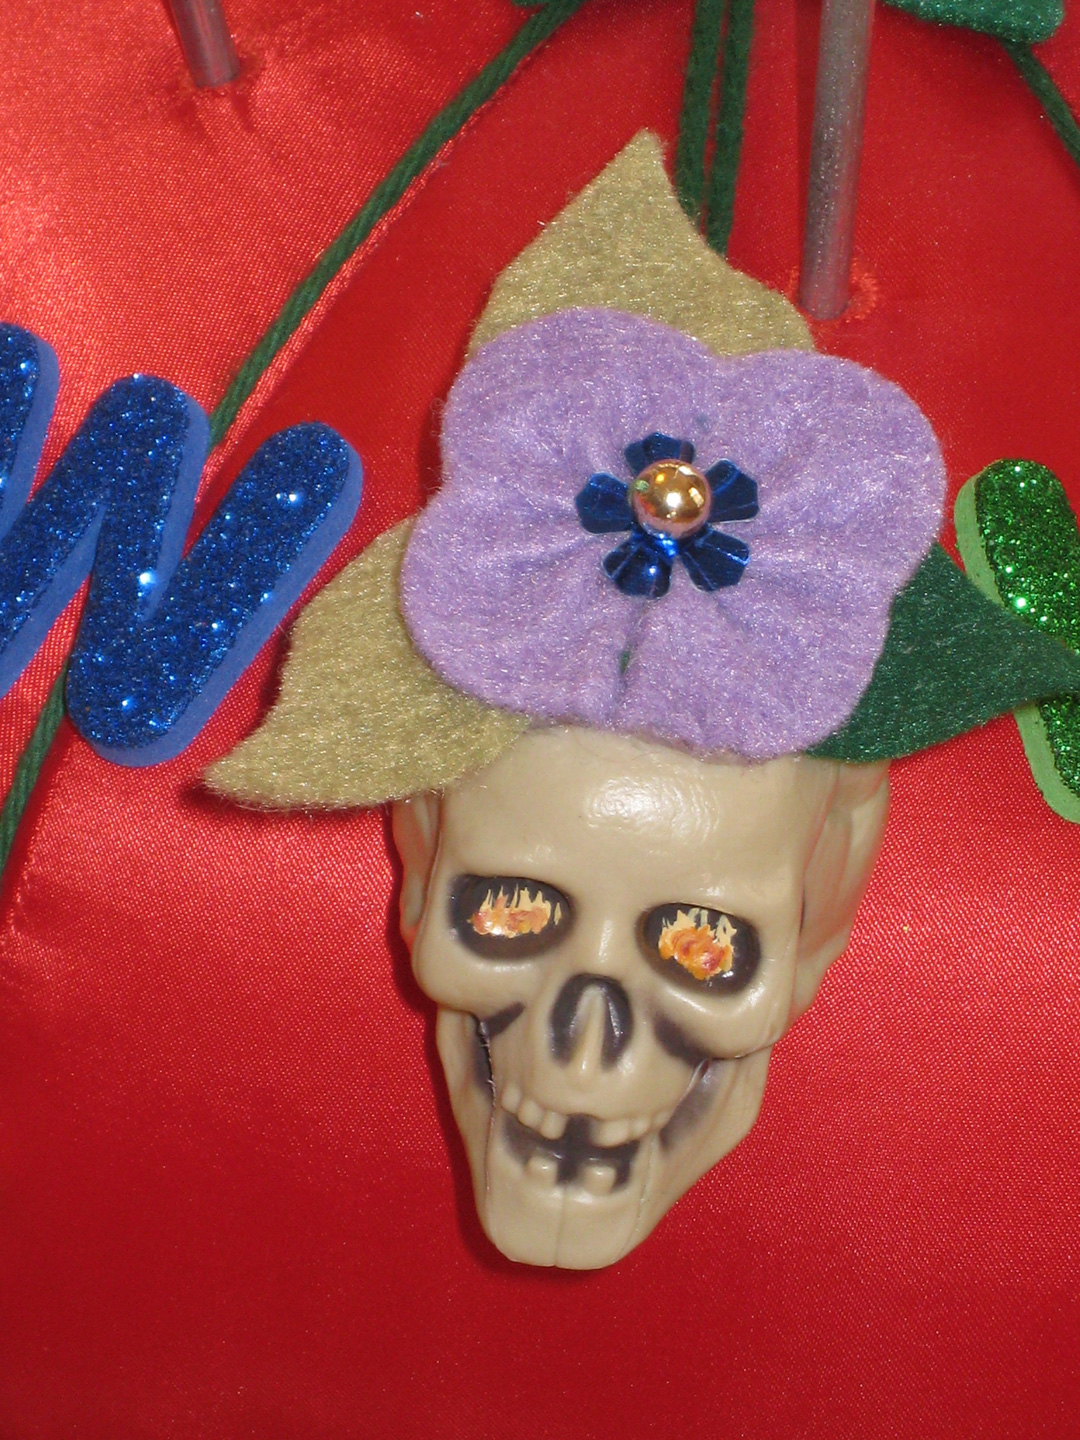
 I drilled holes in the skulls and ran green yarn through them, to hang them on the pincushions where the little emery/strawberry might normally hang. I used craft felt to make various hats for them. The skulls were inspired by tattoo designs by Ed Hardy.
 There was the "Gambling Man":
 The "Blooming Skull":
 And the "Love Kills Slowly"Heart:
 All in all, there were eleven of these pincushions, as I was told there would be ten tables and one serving station.
 To add a little height to the pincushions, one of my committee members used colored yarn to wrap various-sized cans to look like over-sized spools and bobbins. We used double-stick tape to stick the cans to the bottom of the tomatoes, which, BTW, had been covered with a circle of red felt to hide the plywood and staples.
 Since there was one extra square of the black fabric and lots of extra letters, I decided to make a sign to hang at the retreat as well. I arranged the letters as desired, then drew around them, then removed them. I layered this with batting and backing (from my stash) and loaded it onto my long-arm and quilted the areas around the letters, then just used the serger to finish the edges.
 Then we tossed around the sequins and left-over letter, to give everyone something to play with!
 And play with them they did!
 Several people enjoyed playing with the stick-on letters! Okay, yes, that's me, but I wasn't the only one!
 In the end, there really were not 10 dining tables as we thought, so the serving station got two tomatoes and there was one for the coffee table in the sitting area. We had about 70 people at retreat.
 I worked on these for about 6 weeks or so and am SO glad to be finished! Retreat was fun and the people who got the centerpieces as door prizes seemed glad to have them. Yay!
 These tomato pincushions needed LARGE pins. I used some bamboo skewers and spray painted them with chrome paint. Since I wanted to put balls on top, I grabbedt a variety-pack of Sculpy clay from my stash and began mixing colors to make the balls. As each one was formed, I pushed a painted skewer into it and stood it up in a thread spool to allow the clay to dry.
 To harden, this clay must be baked in an oven for 15 minutes at 250 degrees. So I put a cooling rack on a jellyroll pan and placed the pins on their sides on the rack, with the balls hanging off the side (so they would stay round) and baked them.
 Well, as any fool would know, when you bake a painted surface, the paint bubbles off!
This was no exception. My chrome paint bubbled.
So I had to hand-sand each pin and repaint. Only now, I had to keep from getting paint on the clay balls. I made holes in a layer of newspaper and pushed the pins up from below, so only the skewers were visible and tried to repaint them that way. But they flopped here and there, making it impossible to evenly paint all sides. I ended up pulling them out and holding each one (by the ball) in my gloved hand to paint...but of course, over-spray got on the clay balls!
So then I had to use steel wool to rub off the over-spray off the balls...sheesh!
Eventually, the pins were painted and the balls were clean, so I could paint on a layer of clear varnish! Making these pins took days!
Now it was time to figure out how I was going to add flames. I had purchased some yellow organza and used Dyna Flow paint to make it more 'flame-like'.
 Then I cut it into a flame shape, angling the flames toward one end, rather than making them stick out to the sides. I wanted to stitch these flames to a floral stem (wire) to make a trail of flames running up one side of the tomato, so the flames needed to 'reach upward' as they climbed the side of the tomato.
 This seemed to work better than anything else I had tried, so my plan was solidified...I could proceed.
 I painted longer strips of the organza, to make many more flames!
Then I could cut these into smaller pieces to use on the pincushions.
 The flames were attached using hot glue.
 The flames were attached using hot glue.
 One thing I have learned over the years: ALWAYS have ice nearby when working with hot glue! See the little boo-boo bunny in the foreground?
 The boo-boo bunny is made from a white washcloth which holds a plastic Easter egg. Open the egg and put in an ice cube. When the ice cube melts, it is contained and doesn't drip all over the place. I just left the egg open, so I could touch the actual ice if needed. And, of course, it was needed!
 I drilled holes in the skulls and ran green yarn through them, to hang them on the pincushions where the little emery/strawberry might normally hang. I used craft felt to make various hats for them. The skulls were inspired by tattoo designs by Ed Hardy.
 There was the "Gambling Man":
 The "Blooming Skull":
 And the "Love Kills Slowly"Heart:
 All in all, there were eleven of these pincushions, as I was told there would be ten tables and one serving station.
 To add a little height to the pincushions, one of my committee members used colored yarn to wrap various-sized cans to look like over-sized spools and bobbins. We used double-stick tape to stick the cans to the bottom of the tomatoes, which, BTW, had been covered with a circle of red felt to hide the plywood and staples.
She also came up with the idea to add NEEDLES to these pincushions. Using chopsticks, we cut an 'eye' into them using my Dremel tool, then I sprayed them with gold paint. I threaded a length of black rat tail cording through the needle and let it drape around on the pincushion.
Using the hot glue gun, I glued on large colorful plastic buttons. Two packs of foam stick-on sparkly letters provided the SEW HOT words to decorate the pincushions further.
I bought some black fabric to put on the table under the pincushions and searched my stash for sequins that I could toss around to add sparkle...like sparks.
 Since there was one extra square of the black fabric and lots of extra letters, I decided to make a sign to hang at the retreat as well. I arranged the letters as desired, then drew around them, then removed them. I layered this with batting and backing (from my stash) and loaded it onto my long-arm and quilted the areas around the letters, then just used the serger to finish the edges.
 Then I tossed it into the washer to let the quilting puff up.
Well, the BACKING fabric had been pre-washed, but the front and batting had not been. All the puffiness is on the back! Oh well...lesson learned. I will think about that next time I chose a backing! That is why it tends to roll to the front at the bottom...
 I cut off a yardstick and stapled the sign to it. Then I put rat tail through some buttons and glued them on to cover the staples. I made the giant flat-head pin by gluing together 2 foam shapes. The foam's sticky backs had lost their stickiness, so I used hot glue to hold them together. Of course, it oozed out, so after it dried, I tried to clean it up a bit with a scalpel-type seam ripper and slashed open my thumb! Sigh. Fortunately, it healed nicely in a few days.
 I cut off a yardstick and stapled the sign to it. Then I put rat tail through some buttons and glued them on to cover the staples. I made the giant flat-head pin by gluing together 2 foam shapes. The foam's sticky backs had lost their stickiness, so I used hot glue to hold them together. Of course, it oozed out, so after it dried, I tried to clean it up a bit with a scalpel-type seam ripper and slashed open my thumb! Sigh. Fortunately, it healed nicely in a few days.
To carry these to the retreat, I used shopping bags and placed each tomato inside its own bag. This worked nicely; I could carry many more tomatoes per trip to the car/building than if they were not in bags.
 Once at the retreat center, the assembly was pretty fast. Down goes the black cloth (which we folded a bit at the corners since it was on a rotating Lazy Susan) and on goes the centerpiece! We did have to stick the cans to the bottom of the tomatoes but the double-stick tape had already been applied to the cans, so we only had to peel and stick!
 Once at the retreat center, the assembly was pretty fast. Down goes the black cloth (which we folded a bit at the corners since it was on a rotating Lazy Susan) and on goes the centerpiece! We did have to stick the cans to the bottom of the tomatoes but the double-stick tape had already been applied to the cans, so we only had to peel and stick!
  Then we tossed around the sequins and left-over letter, to give everyone something to play with!
 And play with them they did!
 Several people enjoyed playing with the stick-on letters! Okay, yes, that's me, but I wasn't the only one!
  In the end, there really were not 10 dining tables as we thought, so the serving station got two tomatoes and there was one for the coffee table in the sitting area. We had about 70 people at retreat.
 I worked on these for about 6 weeks or so and am SO glad to be finished! Retreat was fun and the people who got the centerpieces as door prizes seemed glad to have them. Yay!