Thursday, April 25, 2013

MOG Dress Construction Pt 2

When it came time to draft the skirt portion of this dress, I was not sure WHAT to start with!

If I chose a Dropped-Waisted DRESS, which seemed like what I was making, the waist of the skirt was straight across...it just seemed odd.

 
So I looked at just using a SKIRT...and adding FLARE.  It had a little curve to the waist but not much.


So I looked at the Empire-Waisted DRESS.  Again, once I cut it off at 6" below the waist, I would be left with a straight line for the waist seam.  Hmmmm.....

 
Next I looked at the Midriff-Waisted DRESS.  This one seemed more promising!  I don't know for sure that the waist SHOULD be curved, but it seemed logical to me that it should.  So this is the one I chose.


On the FRONT pattern, I used the OFFSET tool to offset the waist 6" below it's current level...this is because the midriff of the bodice extends 6" below the waist.  I removed and discarded that upper portion, then duplicated/mirrored the front pattern to create a whole front, adding BIAS grainlines.  Yep, as if this isn't already hard enough, this will be cut on the bias.

 
Again, for the BACK pattern, I offset the waist 6" and discarded the upper part of the pattern.  I chose to add a bit of walking ease to that back center seam...I found KNEE LEVEL on my pattern and CUT the back seam there, then ROTATED (by units) the lower segment outward (CW) by 5".  Bias grainlines were added.


Now I had a layout...I could see how much fabric was required and knew how to layout the pieces.  But I did NOT print the full-size layout...too much paper and assembly!

Instead of printing the WHOLE front, I printed the half pattern, then taped it to more paper at the center line, folded at the center, then cut out the pattern double.  once cut, I unfolded to have a whole pattern.


To cut this large pattern piece, I placed a folded cardboard cutting board on the ironing board and put it right up next to my cutting table.  I carefully layed out the fabric, keeping the cross-grain and lengthwise grain straight.  I rotary-cut what I could on the large mat, then used scissors where I had to.
 Once the front was cut and set aside, I carefully pulled more fabric up onto the cutting table and again smoothed it into place, trying to get the grainlines straight.  I cut one back and then the other.


When it was time to sew, I found that the seam lengths were unequal.  Well, long story short, eventually I compared my cut fabric pieces to the pattern pieces.  Oh dear!  One back was close enough to 'right' to be used, but one was way off!   After cutting other pieces, I no longer had a nice straight cross-grain to align with the matt when pulling up more the fabric on the table. 


I had just enough fabric left to cut ONE MORE back pattern!  And this time, I carefully aligned two cardboard cutting mats on the floor, then carefully aligned the cross-grain with a line on the mat, while carefully aligning the selvedges with other lines on the mat!  I even pinned the fabric to the mat to avoid distortion!

After placing the pattern in postion, I CHALKED around it...carefully!  Yes, this is how it SHOULD have been done in the first place.  But I was trying to take shortcuts...


Once the chalk lines were drawn, I could then pick up the fabric and carry it to my cutting table, where I proceeded to use the rotary cutter to cut it out.  It is much easier for me to cut this way, as opposed to crawling around on my knees with scissors!
 
Finally!  The skirt was finally sewn to the midriff section!  It is starting to look like a dress now!
 
 
I hand tacked the "waist" seam allowances...above and below the midriff section...to the foundation fabric, just to be sure they stayed smoothly in place.

When it came time to cut the lining fabric, there was NO QUESTION as to how it would be done.  On the floor, with chalk...

 
Once again, the pattern pieces were layed out and chalked around while the fabric was pinned to the board. 
 

The lining went in nicely.


I attached the lining to the dress at the neckline, using NO FACING.   I attached the lining to the zipper, too, and (later) made thread chains to connect the seams near the hem.

 
Now it needed some pressing and a hem...but before I could hem it, I had to find some SHOES!
 

To be continued...

Friday, April 19, 2013

MOG Dress Construction, Pt 1

I had a difficult time deciding on fabric to use for my MOG dress.  There was not a huge selection of fabric at my local Hancock Fabric stores...I visited 3 in my area, as well as the Joann's Fabric store!  I really wanted to use silk, but that was not to be, unless I wanted a pale oyster color (which Klassy Katz had!).  I did not want pale oyster or any other pale color.  After trying on a gazillion RTW dresses, I knew I needed a strong color....preferably a jewel tone. 

The MOB had a teal dress so I could not use that.

I finally settled on a polyester crepe-back satin from the BFF line (by Lauren Hancock). There was a coordinating lace, but it wasn't special...not reimbroidered or anything. But this was the best I could do locally and I had procrastinated too long to shop the internet and send off for samples...so I purchased this grape hyacinth-colored fabric.  

As I was trolling the aisles, hoping to stumble onto something better before I had this cut, I spied an odd mesh fabric...it was both purple and gold!  I wondered...what if?

So I bought some of that mesh fabric as well!  I decided to use it UNDER the lace...that way, the dress would have some sparkle without my having to add beads!


I cut each layer of the bodice separately...that is, I cut each piece from 3 different fabrics, one fabric at a time.

As you can see, I bought more than enough fabric...there is plenty of gold mesh left over for more fun things!

And when the lady cut my 3 yards of lace (I only really needed 1.5 but had allowed for experimentation), she used her 'gun' to scan the price on the bolt and said, "Do you know how much this lace is?"
Oh dear, I thought.  "Yes, it is $9.99, but on sale for 30% off."
She was shaking her head, no.  She stuttered a bit..."It is 21---er--"...pause (my heart fluttered...21?)..."seventy cents per yard."
Both of us were sure it was a mistake, but she said she couldn't change it.  I bought all 8 yards!  and for less than the regular cost of one yard!  So I have lots of lace, too!


Once the layers were cut out, I carefully aligned each one and glue-basted them together around the edges. This way, once the glue dried, it could be treated as one layer.


Here you can kinda get an idea of what this looks like once the fabrics are layered.  The gold mesh really added a richness that the lace alone lacked.

I don't know WHAT I will do with all the leftover lace!

Here are the bodice pieces, front and back, all lined up as they fit together.  The FRONT pieces are on top, and the BACK pieces at the bottom.

I serge-finished the edges of the vertical seams before sewing these pieces together.

Turns out, that was not necessary, and was actually not helpful, so much of it was eventually ripped out.


Once the vertical (princess) seams were sewn, the seam allowances were clipped and notched to allow for spread.  This made it easier to remove the unneccesary serger threads!

The bodice pieces went together fairly fast and smoothly.  Then it was time to work on the midriff section.  so back to the drawing board...er, drafting program! 


Once the pattern was made for the midriff, I started to work. I found this woven fabric in my stash of interfacings...I think it was originally purchased to make 'rangers' for jackets...you know, those two pieces of interfacing that encompass the back neck and shoulder and one armhole...they cross in back, giving support and movement.

Anyway, I decided it would be a good foundation layer for my midriff.


I cut my midriff pieces from the woven fabric, then marked and sewed the darts.


How funny it looks once the darts force it to take shape!


Now, at this point, I wasn't sure exactly HOW I was gonna get the midriff done.  I tried DRAPING the fashion fabric over this foundation...for about 27 seconds...!  t
Then I came to my senses!  I am a flat-pattern thinker...my brain just doesn't like to drape.


But then I got a wild idea.


WHAT IF I pleated the fabric BEFORE I put it on the foundation?

I have a pleater board that I made several years ago...it was a sewing guild project and we all made one.  So I pulled it out and set to work.


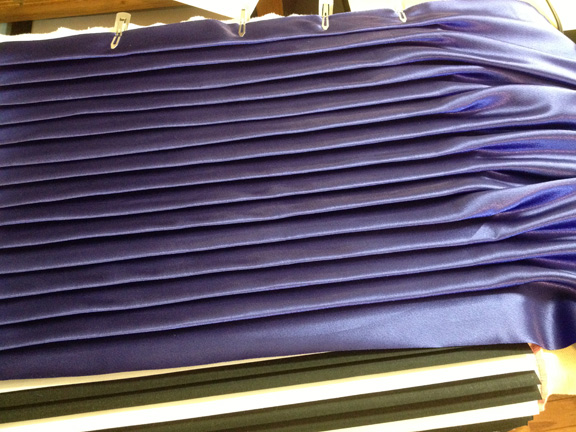
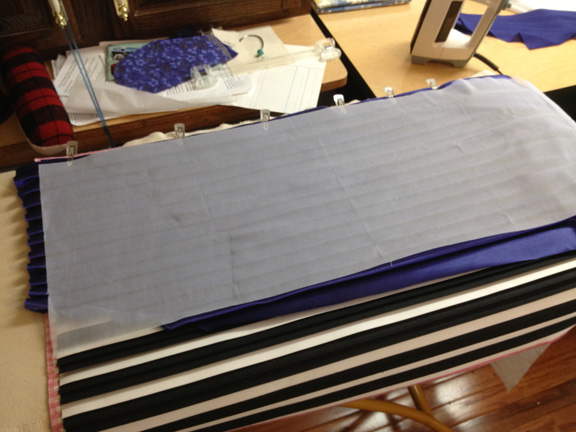
I put the right side DOWN toward the pleater board (I am using the crepe side, not the satin side, as my 'right' side) and began pushing the fabric under the 'lips' of the pleater board...skipping every other one.

Then, I used an iron-on tricot interfacing and pressed it onto the fabric to hold the pleats in place.


I did a wide section for the front, then two smaller sections for each half of the back. 
This took A LOT of fabric!

Once I had my pieces pleated, I began to consider once again HOW I was going to attach this to the foundation.

uh oh.

Even though I had cut this fabric on the bias before pleating it...so it would have lots of 'give'...it was still NOT possible to force this pleated piece to have the same shape as the foundation pieces. 

Rats! 

No, the dart shaping had to be incorporated. 
I went back to the computer and created a new pattern piece for the pleated midriff.

Since the Empire waist was 3" above the waistline and the midriff extended 6" below the waistline, my midriff section was 9" tall.  I divided that into 6 equal parts...1.5" each.

Then I separated the sections and added folding lines, then closed the dart fragments in each section.


I ended up with two sections with opposing curves which would be joined at the waist.

So I cut these pieces from some more fabric...again, placing them on the bias...and began sewing these pleats in.  I folded on the fold lines, then basted on the pleat lines.  Once the pieces were pleated I began hand-sewing them to the foundation.

It was awful.  The bias stretched, causing weird bumps.

So I decided it couldn't be bias.  AGAIN, I cut new fabric to try anew.  I was worried that I might run out of fabric...and I had purchased THE WHOLE BOLT...there was nothing left at the store to go back and get should I run out!

This time I decided to pleat the fabric ONTO the foundation.  I aligned the top edges and pinned.  Then I sewed on the fold line, then folded the fabric upward and pressed...then basted on the pleat line, and sewed again about 3/16th" below that...so that once the basting was removed, the pleat would stay partially closed.  Then I would press the fabric downward again and sew on the next foldline...etc. 

Well, when I got the second pleat done, I realized that the FIRST pleat didn't measure 1.5" as planned.  It was only 1.25".  I decided NO BIG DEAL...I would make the second pleat 1.375", then the third and remaining pleats would be 1.5" and no one would know the difference.

Well, the math didn't work out that way.  once I got to the bottom, there was too much fabric for just one pleat, but not enough space for two pleats with the correct spacing.  I had to start over yet again!

Each time I started over, I had to cut a new foundation...because it wasn't worth ripping out all those pleats to salvage the foundation!

So once again, I pinned the top edge to the foundation and began pleating the fashion fabric to the foundation...this time MEASURING VERY CAREFULLY!  Each pleat was 1.5" wide.

Once the upper section was done, the lower section was begun.
I sewed the waist of the lower section to the waist of the upper section and continued with the pleating.


I even added my machine's quilting guide to help make sure that each pleat was precisely sewn!

Once the midriff sections were finally pleated, I could sew them each to their respective bodice piece. 

FINALLY, it was time to put in the zipper!  My choices were limited...the best color match was not an invisible zip, but in the end I decided to use the invisible one.

I put in the zipper, stopping the top about 7" below the neckline.  I wanted a slit in back but wanted it to be short enough that the dress would cover my bra band!

Once the zipper was in, I could finally sew all the bodice pieces together, front and back, and try this thing on!  Yay!

Well, not yay.  It was too 'blousey' under my bust!  Ugh! 

Even though I had sewn a trial muslin, it was NOT an Empire waisted one.  And we all know that an Empire waist fits more snugly around the ribs than a top with a 'regular' waist.  I was pissed.

Just like in that Pleated Dress I needed to make the waist dart wider at its upper end!  I could pinch out 0.5" under each princess seam at the Empire seam.

I took it apart.  I resewed the lower end of the princess seam (below bust point) to remove additional fabric (0.5"). 

Plus, I had allowed a 1" SEAM ALLOWANCE at the bodice Empire seam (just in case) and had decided I needed to use it all. Well, once the midriff was sewn to the bodice, I DID NOT need that extra!  It was too blousey in length under the bust as well!  so, I also removed this excess length from the front bodice at this time.

Then I looked at that midriff section that I had painstakingly pleated (ad nauseum)...I didn't cry, but I should have!  No, instead I began ripping. 

I ripped the waist seam and the seams holding the pleats ABOVE the waist.  I was finally able to remove the piece of fabric that was the upper front midriff.

I could easily sew the waist dart of the foundation piece larger...basically, it was correct at waist and below, but needed to be sewn straight up from waist to the Empire seam.

Well, think about this....if the dart is wider, that means the SHAPE of the pattern piece that represents the fashion fabric  has now changed, too! So I could NOT reuse the fabric...I had to (yet again) cut another piece of fabric for this upper front midriff section!  At this point, I am measuring to be sure there is enough left to cut a skirt!  There was...

So, I folded out the corrected dart on the pattern and cut the new piece.  Now, HOW am I gonna do this...since the midriff was initially formed by sewing the pleats from the top down?  Basically, I had to sew a lot of it by hand. 

Funny...after hand-sewing for a while, I was thinking to myself, 'this is so much more ZEN than shopping for a dress.'  But I had to laugh at this thought, because only a few hours earlier I wanted to tear my hair out!

I resewed the front midriff to the front bodice.  But remember? I had allowed that 1" seam allowance on the bodice that needed to be removed...ON THE BACK, TOO! 

So, now I had to RIP OUT THE INVISIBLE ZIPPER and remove the excess 3/8" length on the back bodice....then resew the bodice and midriff sections and reinsert that zipper.

Eventually I got the front and back put back together with the zipper in...and it fit!  Now it was time to draft the skirt...

To be continued.

Monday, April 15, 2013

Widening the Back Neck

As mentioned previously, I manually widened the back neck opening on my PMB pattern by 'sliding' the neckline laterally.  I did not rotate the shoulder dart to the neck.


Basically, using the PATTERN EDITOR portion of PMB5, I drew a circle with a 0.25" radius at the CB/neck point. 

  • When drawing this circle, I clicked on the CB/NECK point, then moved the mouse laterally, typed in 0.25 and hit ENTER. 
  • This created the circle but more importantly, it also put the X-construction point of the circle on the right side of the circle...at the 3 o'clock location...precisely 0.25" away from the CB line.
Next, I SELECTED the entire back neck (but NOT the new circle) as well as the medial shoulder segment and the medial dart leg.

I clicked on the CB/neck point, then clicked on the X-construction point of the circle.  This moved the selected items laterally by 0.25".


At this point, there is a 0.25" gap in the neckline at CB.
I drew a new line to fill that gap.

Also, the dart legs now cross...so I found the midpoint between the ends of the legs (Draw LINE between the tips, then, select line, Locate Midpoint) and drew new dart legs to connect the shoulder to the new dart tip (which is the MIDPOINT between the crossed legs).

Here you can see the difference between the original and the new patterns:
You can see that the shoulder dart is smaller (red) and the neck is wider (red) than the original patttern (green).
Because I didn't ROTATE part of the shoulder dart to the neck, the NK/Shoulder Point did not go any higher than it was...it just moved laterally...just as it would have been drafted if the neck measurement was wider.

Monday, April 8, 2013

Wedding Dress Post-Mortem

Well, the wedding is over!  Now it is time to look at the game films and determine what can be improved for next time!    :-)
 
First, let me say, this dress performed brilliantly!  It made a great impression, was comfortable to wear, and allowed freedom of motion.  Plus, it looked cool when I twirled!


But the fit wasn't perfect.  I knew as soon as I put the sleeves in that I had made the shoulders too wide.  Rats!

I didn't put sleeves into the trial muslin...and in the back of my mind, I could hear that little voice telling me to do so.  But I was in a rush (as always) to get this done.  So I confidently skipped that step.  After all, these are tiny little cap sleeves.  I knew that *if* they weren't 'right' they would still be 'good enough'...as in, they wouldn't restrict arm movement because they were so short...so I proceeded with abandon! 

Well, not quite 'abandon'...I did have to rip out the first sleeve I set in, as I mentioned in my last post.

As soon as I got these sleeves in and tried the dress on, I could feel them.  Not painful...just an awareness.  I could feel the tightness of the sleeve's hem...it needed to be a wider sleeve.  The armhole was VERY close to my body!

If you look at the BACK armhole and sleeve, you can kinda see a fold of excess fabric at the ah seam.

And if you look at the FRONT armhole, you can imagine that that ah seam is right up next to my arm in front...no room for moving the arm forward.

Don't get me wrong...I COULD move my arm forward (and did...I danced all night!)...but I could feel the armhole at first.  After a while, I noticed nothing...it was comfortable.  But it wasn't 'right'.

I know from these pictures it would appear that I carried a glass of wine the entire time, but, truely, that was NOT the case!

I put it down every now and then...
While it looks like I am scolding someone, in reality I was not.  I was challenging my SIL to dance!  ...silly...

But see how the back of the sleeve has that fold?  If that armhole seam was just a little farther up on the body, the sleeve would have been wider (so, the hem wider = less constricting) and the fold would disappear (I think).

I used a Back Shoulder Width of 17"...my body actually measures 16.75" between the arm creases WHEN MY HANDS ARE CLASPED IN FRONT...see Helping Measurements if you don't remember.

But if I measure across the TOP of the shoulders, it is not that wide.  I have always struggled with getting the shoulder widths (and thus, the armholes) 'just right'.

I DID use the ARMHOLE SHAPE TOOL to lower the placement of the notch on the back armhole so that the segment ABOVE the notch matched my body's armhole measurement...that is, from my Shoulder Point to the top of the crease where arm meets body.  My body measures 5"...so I lower the ah notch until that upper segment also measures 5". This way, the armhole begins to curve where it should for MY body. That was explained in the last post.

As I said, I DID not lower the FRONT ah notch to force the upper segment of the front ah to match my body's measurements...I felt like that made the armhole much too scooped.  I am now rethinking that choice. 

Next time, I WILL lower the front armhole notch until the upper segment is 4.25"...just like my body.  I think this matters!

As you can see here, there are lots of wrinkles intoduced when the arms are extended. The bodice is forced to move up off the arms and onto the body...so the arm can move.

Of course, no one but ME noticed these things...everyone kept telling me how good it looked and how perfectly it fit.  I just kept my mouth shut and DID NOT point out every little flaw!
(Can you believe that, Marilyn?)    :-)

Guess what?  Those dreaded diagonal wrinkles that I ALWAYS have in back are there again!  Sigh!  I must reduce that Back Shoulder Slope measurement AGAIN!!! 

For next time, in addition to making the shoulders (front and back) more narrow, I will reduce the BSS by .25" *AND* I will also lower the armhole by an additional 0.25".  Hopefully, that will pull those wrinkles up and out.

I know this is a dark picture...I take what I am given! 
I am just thankful to HAVE some images where I CAN do this post-mortem!


I am dancing in this image, so my body is twisted...but you CAN see the wrinkles a little.  You can also see how the armhole seam is right there ON the back arm crease...although the reason I wanted sleeves in my dress in the first place is to HIDE that back arm crease, which I find is one of my less-attractive body parts!

Ok, now that we have established that the shoulders, front and back, are too wide (and the back shoulder slope too long), there is one more thing to notice:  the neck width.  You might need to scroll back up to that first image to see this.

I used a NECK WIDTH setting of 0.5"...which means this neckline should be .5" away from my neck.  Since I am wearing a necklace, you can see that the dress neckline is WAY farther away from my necklace chain than 0.5"! 

That is a BIG DEAL.

And it explains alot.

The length of the shoulder seam on this dress is 'right' for me. 
The problem is, this shoulder starts too far from center!

PMB version 5 removed the Shoulder Length measurement, which, in earlier versions, could be used (in combination with the Front Shoulder Width measurement) to determine the width of the neck opening on the front pattern. 

In earlier versions, the front neck opening could be a different width than the back neck opening (which was determined by the NECK CIRCUMFERENCE measurement). 

But in V5, front and back neck openings draft equally...and the NECK CIRCUMFERENCE measurement controls this width.

I pulled out an old pattern...actually, it was the pattern for the wrap-top I wore to the rehearsal dinner!
I'll show you: 


This top was made back in 2008...using Version 3.  The neck width used on this one was also 0.5"...but as you can see, it is much closer to MY neck!

Ok, yes, there is wine in this picture also...but REALLY, I don't have a problem!   :-)

But back to the clothing...

This top isn't perfect...the bust darts are too low for one thing!...but like most of the things I make, it is wearable and looks pretty good.  So, when I compared the pattern for this top with the one used to make the wedding dress, I kept that in mind.

Ok, here is the basic torso pattern I used to create the MOG dress...highlighted in RED.   The yellow/greenish pattern is the one used to create the Teal Satin Wrap top (in 2008).

If you look at the NECK WIDTHS, you will see they are pretty much the same.

But look at the difference in SHOULDER WIDTHS on these two patterns! 


....and the TEAL one fits just fine across the back...

Just look!

While I am not 'posing' for the picture, you can see that I have plenty of mobility...there is no stress across the back. 

This Teal Top was drafted with a Back Shoulder Width of 15.5"...not the 17" that I used on the MOG.

There was no back shoulder dart to sew...a tiny bit of ease only.

BUT...at that time, so that I would NOT have a big dart, I manually rotated this pattern's back armhole outward (pivot point = SHOULDER POINT)...to give more ease at the level of the lower armhole area. 


OK, so now...look at the comparison of the FRONT patterns. 

The RED is the block I used to create the MOG dress.

The BLUE is the 2008 Teal Wrap top pattern.

Compare the front neck widths.

With center fronts aligned, the MOG pattern has a wider neck opening than the Teal Wrap pattern....measure straight across from neck point to CF (if it were extended upward).

Now, this front neckline on the Teal top drafted narrower than the back neckline on the Teal top...because I could draft that way using V3.


I used a NECK CIRCUMFERENCE measurement of 14" for the Teal Top...in V3.

For the MOG dress, I used a NECK CIRCUMFERENCE measurement of 13.5"...in V5.

Even with the smaller NECK measurement, the FRONT neck in V5 drafts wider than the neck of the V3 one!

But remember, in my last post, I said I had to WIDEN the back neck so that it would be wider than the front neck?  I can now see that the back neck was the one that was the right width!  It was the FRONT NECK that was too wide...the back wasn't too narrow!

But since I was using that very wide BACK SHOULDER WIDTH measurement (17") and getting a large back shoulder dart, I saw widening the back neck as an opportunity to reduce that dart...it didn't even occur to me that the front neck width was actually the problem!

So, FOR NEXT TIME...I will reduce the NECK MEASUREMENT from 13.5 to 12".
This will draft a neck that matches the FRONT of my old patterns.

I will use a FRONT SHOULDER WIDTH of 15 (instead of the 15.5" used this time).
I will use a BACK SHOULDER WIDTH of 16 (instead of the 17" used this time).
This is a 0.5" reduction in FRONT shoulder width, but a 1" reduction in BACK shoulder width.  This will result in a smaller back shoulder dart.

At right, you can see the original MOG pattern in RED.  The Blue/green patterns are the 'NEXT TIME' choices.

The front neck opening is narrower...but the length of the shoulder seam is the same as before...as if the shoulder was just 'shifted' medially. 

The front armhole is moved inward .25" and allowed to scoop lower (this is the questionable part!).  But the upper ah segment matches my body's 4.25" measurement!

I lowered the overall armhole DEPTH another 0.25"...for an ah depth setting of 0.5".

ON THE BACK, you see that the new back neck (green) is narrower than before.  But, remember? I said it was the back neck width that was actually correct before I widened it!  So, again, I will manually widen it to eliminate some of the back shoulder dart width...I will restore the back neck to the width it was before...on the original MOG! 

So, basically, I am using a smaller-than-real neck circumference measurement to draft the desired width of the FRONT NECK, then I will widen the back neck using some of the shoulder dart.

The back shoulders will be narrower across the top of the pattern.
The lower armhole will move inward 0.25", as well as downward 0.25".
The back shoulder is more sloped on this new one...as if the back armhole was 'shifted' downward on the pattern by 0.25".  I am hoping this is enough to eliminate those diagonal pulls!


Ok, so here is how the NEW (next time) pattern...in RED...compares with the pattern for the TEAL top.  With center fronts aligned, the new neck width is almost the same as on the old one...close enough.

The Front armhole is very different...we'll see how this works out.  Might be wonderful!

Note--The waist is higher on ALL these newer patterns (including the original MOG) than it was on the TEAL top.

On the BACK, the NEW (next time) RED pattern has a narrower neck width...but this is ok, because there is still a back shoulder dart to steal from!  I will manually widen this neck.

The new pattern has a slightly more sloped back shoulder than the TEAL one...this is desireable.

Since the TEAL one's back armhole was manually rotated outward, this new back armhole compares favorably, with no rotation needed.


And on both front and back, you may notice the difference in width at sideseams...
...the TEAL top used a 41.5" bust measurement with 3" of ease. 
...the MOG (and this new version) used a 42" bust with ZERO ease!


Gosh, I was gonna show how I widen the neck, but perhaps that needs to be a separate post! 
Thanks for reading!


Free Hit Counter