Tuesday, January 17, 2012

The PMK Crossed Panel Top

As I mentioned before, back in September I drafted a pattern for a knit top using Wild Ginger's patternmaking program for knits (PMK). The style I chose was the CROSSED PANEL. This has front shoulder princess seams and overlapping center panels which create a V neck.
Since the final outcome is not one I would repeat, I won't go into my drafting choices, but here you can see my pattern:
I WILL tell you that I had the bust level too high, and the bust points too close to center.

Also, the upper back is too short...as is the upper front! sigh.
I chose a beige textured knit from my stash to use for this top. This is a fabric I really liked and had been saving until I was sure about my pattern's fit. Apparently, I didn't save it long enough!

I had limited yardage, so had to be creative about the layout. Both center panels are supposed to be full-sized, but I decided it was unnecessary to make the underpanel reach the hem. By cutting the left panel shorter, I was able to fit the pattern onto this fabric.

BTW, although that is a pattern for a short sleeve, I DID cut a longer sleeve...3/4 length was all I could fit, though!
The contruction order of this style took a few minutes to work out! I decided that the first step was to partially sew the front princess seams...just above the bust.
That way, I could sew the front shoulder seams, which needed to be done before the neck edge was finished.
This looked really odd...all these pieces going off in all directions!

I basted around the neck edge (using red thread!) so I would know how much to turn under for the coverstitch.
Then I used the coverstitch machine to finish the neck edge.

Once the neck edge was finished, THEN I could sew the remainder of the front princess seams. After that, the contruction order was pretty normal.


I was not thrilled when I first tried this on.
Those sleeves were awfully twisty! barf. The lower edge is just folded under...there is no hem on the sleeves. I was just checking to see how it looked before finishing up. Needless to say, those sleeves came out!

But remember, i was short on fabric! I didn't have extra to cut more sleeves. I had to make these work.

I went back to the drafting board and created new patterns and compared. This is when I realized I had made a big mistake by choosing a C cup in my measurement chart! The front armhole is too long for me...I need more difference in the size of the front and back armholes and this is accomplished by using a bigger bust cup size.

Hmmmm.... I began to wonder if I could use the DART OVERRIDE to save this one.

The Dart Override tool makes the front armhole smaller and the bust dart larger (it will also do the opposite, depending on the setting choice).

So I redrafted using the DO and printed only the sleeve.
I just barely had enough room to recut the old sleeve using this new pattern. The cap mound of the new sleeve (paper pattern) is more 'forward' than the mound of the old sleeve. This is better for my body and will relieve the twisting.


To sew this sleeve into the existing armhole, which was NOT cut using the dart override, I had to ease the armhole to the sleeve in the lower front area. But this is a knit, remember? Knits are more forgiving of stuff like this!


The final shirt is just ok. I love the fabric. I like the neckline. The crossover pulls and causes folds because the dart position was not properly located for my body.


Also, the armholes are still not just right. I think instead of reducing the size of the front armhole, I needed to increase the size of the back one. But that would have called for a larger sleeve that could not have been cut from the first sleeve fabric. When I wear this top, I am aware of the armholes.

I am toying with the idea of just sewing the armhole deeper. I am torn, though...will it make it more difficult to raise my arms?
Overall, it isn't bad looking...despite that little bobble in the front hem that I created when coverstitching the hem and ran into a thicker area at the princess seam!
I really will have to fix that if I intend to wear this shirt out of the house!

Thursday, December 15, 2011

PMK, darts vs no darts

Before, I mentioned that I generally choose the DARTED silhouette instead of using the NO DART choice, even when I plan to sew no darts. Here, I hope to show you why.

Below, I have superimposed two patterns...each using the identical measurements and settings EXCEPT, the RED one chose a SIDE DART and the blue/green one used NO DART.

With both pattern sets aligned at the shoulders, you can see that the front pattern is almost the same, with or without the dart.

But look at the back patterns. The no-dart pattern (in green) has a shorter back armhole depth than the darted one (in red).
But that isn't all...look at the overall length of the back patterns.

When I align the pattern sets, matching at the waist and hem, you can easily see that the back pattern of the NO DART set (green) is actually LONGER than the one that uses a dart (red), even though BOTH pattern sets were made using identical measurements!
PMK shortens the back length when a 'dart' is chosen.
I have adjusted my BACK length measurement to be longer than 'real' so that when it is shortened to use with the darted pattern, it will still be adequate.
Of course, this was NOT discovered before I sewed that last 'dud' I mentioned before...

I had assumed the overall back length of my newly-sewn top would be just the same length as the back of the previously sewn knit tops if I used the same measurement!

But no, that isn't the case when darts are chosen for one pattern but not the other.

But as I said, this is a recent discovery... sigh.

But to me, the real issue with the no-dart choice *is* the change to the upper back...that raised back armhole level. The upper back is now shorter from the underarm level up to neck.
My no-dart garments will pull to the back, trying to borrow fabric from the front. This happens because the back armhole height is too short...the distance from underarm level to the back neck on the pattern was reduced.

Also look at the sleeve. The shortened back armhole creates a sleeve with a smaller back half. This contributes to the "pulling-to-the-back" and a general feeling of tightness. When the back armhole is smaller, the back of the sleeve is smaller...there is less fabric there.

Also, this narrower sleeve's cap height would need to be made shorter to maintain the same bicep measurement across the sleeve as on the darted one...and that lowered cap height can introduce pulls that might not be there if the darted bodice were chosen. In the example above, I did NOT change the cap height on the sleeve...and you can see that the two sleeves are NOT the same width.


But here, below, you can see what happens when I change the cap height on the DARTLESS top...reducing the cap height by 0.25" so that the bicep width on the sleeve is nearly the same as before. The patterns are aligned at the front underarm point (because the front armhole on both patterns is nearly the same, I choose that as my point of alignment for comparison).


Anyway, THAT is why I choose to use the DARTED silhouette, even when I plan to sew NO darts! YMMV.

Saturday, December 3, 2011

PMK and shoulders

Edited near end for clarity, bold

I bought the knits program from Wild Ginger when it came out, but have not taken enough time to really use it as I'd like.

I told you previously about 3 of the knit tops I made, trying to work out what settings and measurements I should use. While those tops are wearable, they are not representative of the choices I'd make if I had the chance to do them over again!

I have since done yet another knit top that I am also less than thrilled with...it is not as wearable as these others!...but I have learned a lot from this one, too, and think I have finally nailed down MOST of the choices that I need to make.

Before I show you the latest 'dud', I'll show you what I have learned.

I have tried to explain this before on the chat list and forum, but as we all know, a picture makes things SO much easier to understand!

Here is the basic knit top as it drafts with my measurements...almost.
I did lower the armhole depth by .25" on this, and as you can see, I chose the DARTED version (because I am a D cup--More about that later).
You can see that the shoulders are very slanted, both in front and in back. This is critical to notice. When the program first came out, many people were surprised to see those sloped shoulders, but were assured they worked...just try them. Well, after trying them, many were still not satisfied with the fit, so the company added settings to enable adjusting the shoulders as desired. This company does listen to its customers and tries to please.

Here you can see the basic pattern with the front and back superimposed on each other, with neck points aligned.

Notice that the shoulder angles, front and back are the same.

The shoulder WIDTHS, front and back, are the same. The program uses the back shoulder width to draft...there is no measurement for the front shoulder width. So the upper chest area in front is the same width as the upper back area in back...you can see the upper armholes are superimposed. Right away, I know that is a problem, because my body is wider in the back at that level than in the front.
Here you see the same basic pattern with the front superimposed over the back, but this time, it is aligned at the waist and hem. You can see that the front pattern is LONGER than the back pattern, because I am using a D cup in my measurement chart. If I used a C or less, the front would be the same overall length as the back.
Now, I have made some changes to my shoulders using the settings that were added to the program.
  • I used a SHOULDER HEIGHT setting of .75...this raises the shoulders up on BOTH patterns by .75".
  • I also used a SHOULDER POINT setting of .5...this moves the shoulder point (at arm) forward by .5".
The net result of these settings is that the front shoulder is still pretty slanted, almost like it was with the original draft. But the back shoulder is much more 'square'.

Here you can see the new pattern IN RED superimposed on the original pattern (in green/blue).
At a glance the new pattern doesn't look all that different...nothing remarkable about it.
But look what happens if you flip and superimpose the new front onto the new back.
Immediately, you notice that the shoulder angles are NOT the same, but the back shoulder is higher.
But look at the shoulder WIDTHS. While the actual seam length of the front and back shoulder seams ARE the same, the width of the patterns across the upper chest and upper back are NOT the same! The back pattern is wider...you will see that the back armhole is farther out than the front armhole is...by about 3/8". Now, I don't know about you, but that looks more like how MY body is shaped!
Here you can see those same new front and back patterns (flipped and superimposed) aligned at the waist and hem. Again, you can see that the upper back pattern is wider than the upper chest area, and the front pattern is still longer (at the neck point) than the back pattern (because of the D cup).
The new back shoulder angle looks more like the shoulder slant on my regular (non-knit) pattern. Can't you just see those shoulders sewn together and curving forward on my shoulders which also just happen to curve forward (like the shoulders of many of us!)?
How does this affect the sleeves? Well, the original sleeve is below.
And here is the new, adjusted-shoulder sleeve.
It takes some careful observations to see the differences! But if I superimpose them, it will be easier.

Below, the RED SLEEVE is the NEW, adjusted shoulder sleeve...and the green one is the original. I have aligned them at the front underarm.

Because the front armhole on the NEW pattern is not very different from the front armhole on the OLD pattern, the front of the sleeve is not very different. the new armhole has a slightly more-square shoulder...not much difference, so not much difference in that area of the sleeve.

You can see that the new, RED sleeve is bigger in the back of the sleeve cap. Duh...the back armhole of the new bodice is longer than the back armhole of the original bodice, because the new back shoulder is taller! The RED back cap line is about 3/8" outside the original sleeve, which means it will provide about 3/8" more fabric in the critical 'forward-movement' (driving room!) area. (edits in bold)

I also mentioned that I use the DARTED basic silhouette, rather than the no-dart version. I don't plan to actually SEW this dart...it will be eased in the seam and will disappear...so I consider this my dartless block.

More about WHY I use the darted instead of the no-dart, later...

Wednesday, November 16, 2011

Retreat Centerpieces

As I mentioned in my last post, I was on the Hospitality Committee for my quilt guild's annual retreat, so it fell to me to make the centerpieces for the dining room. The theme this year was SEW HOT...hmmm.

I didn't want to go with the expected hot chili peppers or 'south of the border'- type imagery, but also didn't think using candles with actual flames was a good idea either. The idea that kept coming into my mind over and over was that of flaming pincushions. Eventually, I decided to go with that.

To begin, I needed a pattern. I went to WILD THINGS, a free pattern-drafting program by Wild Ginger for making accessories. I chose the crown of the BASEBALL HAT pattern to make my tomatoes, drafting the pattern over and over with various measurements until I finally got one that seemed like the right size. I sewed about 6 or 7 prototypes in a stash fabric before I was satisfied with the size and shape. Then I went to the red satin.


I began sewing the sections together, but soon decided I should add sewn eyelets to the sections before sewing them all together. That way, I could insert giant pins into the pincushion without causing the red satin to run or pull. I just used a piece of paper napkin as a stablizer under the fabric as I sewed the eyelets...it pulled right off.

Once the tomatoes were sewn together, they needed a base. So I went out to the garage resource center and pulled out some 1/2" plywood and began cutting. Using the circular saw, I first cut strips, then cross-cut them into squares.
I had used a ruler to draw lines plus a template to draw circles onto the plywood, so I would know where to cut.

Next I took the squares of wood to the band saw and cut the circles free-hand. Precision wasn't totally necessary here!

Back in the sewing room, I pushed a plywood circle into the bottom opening of each stuffed tomato and used an electric staple gun to secure the fabric to the wooden base....like doing upholstery work!

Here you can see the stuffed tomatoes. The pattern I used is there in front, as well as some of the ideas I was working on for embellishment.

Once the tomatoes were stuffed and stapled, I used the green yarn to wrap around them, like a real tomato pincushion. The little 'blossom end' was cut from green felt.

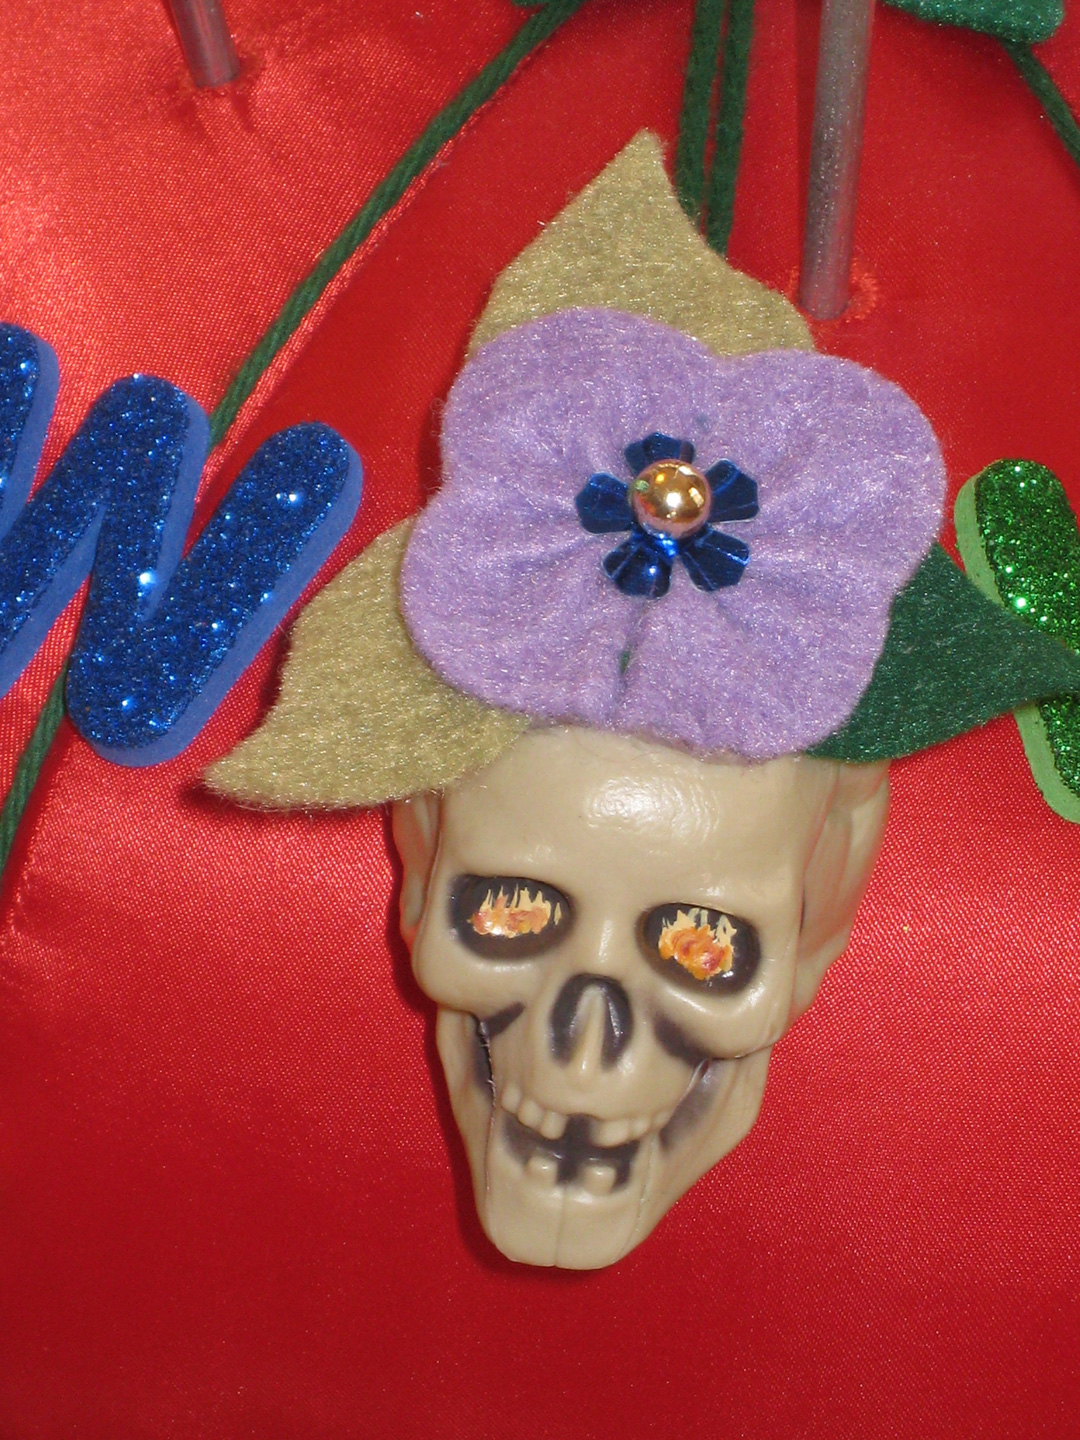
I bought some plastic skulls at Michael's...it was before Halloween...and I used craft paint to paint flames in their eye sockets. You can see the difference here...before and after flames.

While this seemed like it would be easy, it was more difficult that I thought! I had to use a tiny paintbrush with very few bristles! I also had to keep reminding myself that precision wasn't necessary...these were for a centerpiece that might end up in someone's garbage!

These tomato pincushions needed LARGE pins. I used some bamboo skewers and spray painted them with chrome paint. Since I wanted to put balls on top, I grabbedt a variety-pack of Sculpy clay from my stash and began mixing colors to make the balls. As each one was formed, I pushed a painted skewer into it and stood it up in a thread spool to allow the clay to dry.

To harden, this clay must be baked in an oven for 15 minutes at 250 degrees. So I put a cooling rack on a jellyroll pan and placed the pins on their sides on the rack, with the balls hanging off the side (so they would stay round) and baked them.

Well, as any fool would know, when you bake a painted surface, the paint bubbles off!

This was no exception. My chrome paint bubbled.

So I had to hand-sand each pin and repaint. Only now, I had to keep from getting paint on the clay balls. I made holes in a layer of newspaper and pushed the pins up from below, so only the skewers were visible and tried to repaint them that way. But they flopped here and there, making it impossible to evenly paint all sides. I ended up pulling them out and holding each one (by the ball) in my gloved hand to paint...but of course, over-spray got on the clay balls!

So then I had to use steel wool to rub off the over-spray off the balls...sheesh!

Eventually, the pins were painted and the balls were clean, so I could paint on a layer of clear varnish! Making these pins took days!

Now it was time to figure out how I was going to add flames. I had purchased some yellow organza and used Dyna Flow paint to make it more 'flame-like'.

Then I cut it into a flame shape, angling the flames toward one end, rather than making them stick out to the sides. I wanted to stitch these flames to a floral stem (wire) to make a trail of flames running up one side of the tomato, so the flames needed to 'reach upward' as they climbed the side of the tomato.

This seemed to work better than anything else I had tried, so my plan was solidified...I could proceed.
I painted longer strips of the organza, to make many more flames!
Then I could cut these into smaller pieces to use on the pincushions.
The flames were attached using hot glue.

One thing I have learned over the years: ALWAYS have ice nearby when working with hot glue! See the little boo-boo bunny in the foreground?

The boo-boo bunny is made from a white washcloth which holds a plastic Easter egg. Open the egg and put in an ice cube. When the ice cube melts, it is contained and doesn't drip all over the place. I just left the egg open, so I could touch the actual ice if needed. And, of course, it was needed!
I drilled holes in the skulls and ran green yarn through them, to hang them on the pincushions where the little emery/strawberry might normally hang. I used craft felt to make various hats for them. The skulls were inspired by tattoo designs by Ed Hardy.

There was the "Gambling Man":

The "Blooming Skull":
And the "Love Kills Slowly"Heart:

All in all, there were eleven of these pincushions, as I was told there would be ten tables and one serving station.

To add a little height to the pincushions, one of my committee members used colored yarn to wrap various-sized cans to look like over-sized spools and bobbins. We used double-stick tape to stick the cans to the bottom of the tomatoes, which, BTW, had been covered with a circle of red felt to hide the plywood and staples.

She also came up with the idea to add NEEDLES to these pincushions. Using chopsticks, we cut an 'eye' into them using my Dremel tool, then I sprayed them with gold paint. I threaded a length of black rat tail cording through the needle and let it drape around on the pincushion.

Using the hot glue gun, I glued on large colorful plastic buttons. Two packs of foam stick-on sparkly letters provided the SEW HOT words to decorate the pincushions further.

I bought some black fabric to put on the table under the pincushions and searched my stash for sequins that I could toss around to add sparkle...like sparks.

Since there was one extra square of the black fabric and lots of extra letters, I decided to make a sign to hang at the retreat as well. I arranged the letters as desired, then drew around them, then removed them. I layered this with batting and backing (from my stash) and loaded it onto my long-arm and quilted the areas around the letters, then just used the serger to finish the edges.

Then I tossed it into the washer to let the quilting puff up.

Well, the BACKING fabric had been pre-washed, but the front and batting had not been. All the puffiness is on the back! Oh well...lesson learned. I will think about that next time I chose a backing! That is why it tends to roll to the front at the bottom...
I cut off a yardstick and stapled the sign to it. Then I put rat tail through some buttons and glued them on to cover the staples. I made the giant flat-head pin by gluing together 2 foam shapes. The foam's sticky backs had lost their stickiness, so I used hot glue to hold them together. Of course, it oozed out, so after it dried, I tried to clean it up a bit with a scalpel-type seam ripper and slashed open my thumb! Sigh. Fortunately, it healed nicely in a few days.

To carry these to the retreat, I used shopping bags and placed each tomato inside its own bag. This worked nicely; I could carry many more tomatoes per trip to the car/building than if they were not in bags.

Once at the retreat center, the assembly was pretty fast. Down goes the black cloth (which we folded a bit at the corners since it was on a rotating Lazy Susan) and on goes the centerpiece! We did have to stick the cans to the bottom of the tomatoes but the double-stick tape had already been applied to the cans, so we only had to peel and stick!

Then we tossed around the sequins and left-over letter, to give everyone something to play with!
And play with them they did!

Several people enjoyed playing with the stick-on letters! Okay, yes, that's me, but I wasn't the only one!
In the end, there really were not 10 dining tables as we thought, so the serving station got two tomatoes and there was one for the coffee table in the sitting area. We had about 70 people at retreat.

I worked on these for about 6 weeks or so and am SO glad to be finished! Retreat was fun and the people who got the centerpieces as door prizes seemed glad to have them. Yay!

Friday, November 11, 2011

hair on fire


I feel a bit like I have been running down the street with my hair on fire! I've been hurrying here and there, with little time for normal day to day activities. My cupboard is bare! But my clothes are clean...

I went to the International Quilt Festival in Houston last week...I was gone 7 days! I returned on Monday and have had activities every day this week. Now it is Friday and I am off to retreat! Uncommon Threads Quilt Guild has an annual retreat each November and this year, I am on the Hospitality Committee...which is responsible for the centerpieces and small room gifts. Our theme this year is "SEW HOT". When I get back, I'll share more about it, but above is a sneak peak at a centerpiece.
 
Free Hit Counter