Showing posts with label making clothes. Show all posts

Sunday, June 30, 2013

Peacock Silk Top for Grand Reception

***Edited in Purple---patternmaking, side-back princess seam.

I had signed up to attend the Grand Reception, held on the night before the quilt show opened.  This is a semi-formal affair, so I needed something 'special' to wear.  I decided to try to copy a Watters H2O top that I had tried on during my MOG dress-shopping marathon.  And I had just the right fabric for this...a peacock-colored silk that I had picked up at the Fabric Collection in Jackson, TN, on one of the MOG dress shopping trips!

Here, you can see me in the final top...along with Etta McFarland (my travel buddy!) and Jim West, the Managing Director of the IQFOI and founder and CEO of Travel Alliance, Inc., which operates the Sew Many Places travel company who organized the tour for us.  We were walking along talking with Jim when we stopped to take a photo...but look at how well we 'match' the quilts in the background!  And who doesn't love a man in a kilt? :)


To make my top, I began with the basic blouse pattern with side and waist bust darts as well as back shoulder dart.  I used the program settings to widen the neck opening, but had to manually create the neck shape I wanted.

Notice the shape of the sleeve pattern:  I have found that I get the best sleeve cap shape when I keep the wrist circumference very small...too small!  Widening the wrist narrows the cap (a program flaw that I have been complaining about for years now!) so it is best for me to draft with a small wrist then redraw the sleeve below underarm level manually.

I used ZERO bust ease* and 4.5" hip ease. 
I wanted the waist darts to measure 1.5" wide, so I adjusted the ease level until that width was drafted.  The waist ease setting ended up being 3.5".

*Knowing what I know NOW, if I was doing this over again, I would use a bit more bust ease.


I rotated the side bust dart to the shoulder. (Why not just start with the dart there, you may ask.  PMB cannot keep the armholes constant when the dart is rotated, so I start with this same side bust dart and make my changes manually.)

I also drew in the 'princess' line, which I wanted BESIDE (not 'ON') the bust point.
I also located the 'V' portion of the neckline.
I copied/mirrored the front pattern to create a WHOLE front, drew the new curved neckline, then eliminated the portion beyond the princess line on one side....this is a wrap front style.
Next, I drew a circle on the bust point, radius = 1.5". 
I used the LOCATE POINTS tool to divide the edge of the wrap (between waist and neck) into four sections...locate three points.
I drew lines from each of these points to either side of the bust circle, as well as to a point located on the sideseam that was 3.125" below the underarm.  These lines were to become the pleats.  
I used the SCISSORS TOOL to CUT the CF line into segments...this is important.

I measured that shoulder bust dart, then rotated HALF to the first pleat and HALF to the second pleat. 

When the pleats are opened, those CF line segments change their orientation.  That TOP segment will eventually become the grainline for this pattern.

At this point, I copied the pattern and extended the top CF grainline, then rotated the pattern so that the grainline was vertical.  Now I had the pattern for the LEFT side...and instead of pleats, those would be sewn as darts (so as to reduce bulk).
I continued working on the RIGHT side.  I drew in another line BELOW the waist...now I had three lines (including the waist) that still needed to be converted to pleats.  I did NOT rotate any of the bust dart to these lines...it was ALL put in those top two pleats.  These were simply rotated open to add fullness so they were equal in width to the other pleats...this was done AFTER I had separated the SIDE FRONT from the CENTER FRONT section.

Again, the top CF line segment was extended and the pattern was rotated to make it vertical.
Now I had a pattern for the left front, one for the right front and one for the side front.
Time to work on the BACK. 
As mentioned before, my back neck opening drafts NARROWER than my front neck opening...which is bad.  I am told it doesn't happen to everyone...depends on the measurements.  Anyway, I shift the back neckline (PINK) laterally by .25" and redraw the back shoulder dart (RUST)  smaller to control the length of the back shoulder seam.
To get rid of the back shoulder dart:
I rotated the back shoulder dart to the armhole...at the 1/2-BAH height level.  Then I drew in the princess lines to incorporate the waist dart, curving to create a nice shape.  One side of the princess line (BLACK)  touches the upper leg of the now-armhole dart and one side of the princess line (RED)touches the lower leg of the now-armhole dart.  This incorporates the shoulder dart uptake into the princess seam and eliminates the need to sew a separate shoulder dart.

***see edit, below.
HOWEVER, now the two princess seams, BLACK and RED, are not the same length.  So I measured and found that the red line (side-back princess seam) needed to be lengthened by 0.5" to equalize these seams.  I drew in the BLUE segment (on right image), which is 0.5" long, then ROTATED the lower armhole (GREEN) by 0.5" CLOCKWISE, pivot point = underarm point (PINK CIRCLE). 
***Edited to correct-
On 07-28-13, I was putting away these patterns and I saw a hand-written note on this side back pattern piece with a reminder of something I had forgotten.  After sewing, the back princess seam seemed 'poufy', so I ripped and REMOVED that extra .5" that was added to the back armhole to equalize the princess seams.  So, apparently, it might be better to just leave those seams unequal in length...at least for me!

Now all that was left to do was separate the patterns, add seam allowances, and clean them up.  I added generously at the tip-top of the side back (and side front) princess seams, then trimmed away any excess when I cut out the paper pattern pieces and fit them together.  This one only needed a tiny bit of trimming.

Using this pattern, I cut out the silk dupioni as well as the silk organza (the underlining).  BTW, that organza was white when I bought it, but I prewashed my fabrics together...now it matches.  :)


I started out hand-basting these pieces together, then tried machine basting, but evently resorted to glue-basting the underlining to the fashion fabric.  Those front pieces had LOTS of darts/pleats to baste around!


For my loops, I found a great tutorial on making narrow spaghetti straps on this site. She uses a bobby pin to turn the narrow tube...genius!  Check it out...


Oh!  My buttons!  Would you believe I found this set of buttons to cover in my grandmother's stash?  Again, her stuff comes to my rescue, just as it did with the button for the MOG dress.  This set had just the right amount of buttons, in just the right size...hard to find at the local store these days!

 
My loops, as seen from the inside:


Here are the loops and the buttons, as well as a snap I sewed on near the lower edge to help keep the hem closed.  Since I lined this top with black Ambience, I didn't have any peacock-colored china silk to cover the snap with...so I used it as-is.

To hold the underlayer, I sewed a button onto the lining at the princess seam, catching only the lining.  I wasn't sure if I should try to catch the outer layer (seam allowances) too, or not, so I just caught the lining.  I made a thread loop to go over the button.


Here you can see the buttoned inside...


At one point during construction, I was very frustrated.  I had the neckline all stitched, trimmed, clipped and understitched...but those 'points' were kind of wanting to stick out away from my body.  I had forgotten to trim a bit off the facing pattern and I was afraid this was the cause.  I ripped one side...understitching, mind you!!!...and scooted the seams as if the facing had been trimmed...then pinned to see if that might fix the problem.  I couldn't really tell...

About that time my doorbell rang.  It was my next door neighbor, who hasn't been over to my house in years!  She had come to say hello and see my sewing room.  I took her up and showed her around, then told her about the problem I was having with this neckline.  She then told me about a particular collar that gave her fits (long ago), so she went to the storage room and grabbed some WIRE and sewed it into the collar seam...now she could shape that collar any way she desired!  Well, a lightbulb went on over my head!  YES!  She also said that if the hem of a jacket wanted to flip out on her, she would sew a quarter into the front hem/corner!  Genius!

As soon as she left, I put the ripped-out neckline back as it had been before I ripped it.  I hand-sewed some thin copper wire along the neck corner seamline...bending the ends to prevent pokies.  Worked perfectly!  I could probably have used the heavier gauge wire (in my jewelry-making stash), but I didn't want to be able to feel it (with my hand).  Then, when I got to the hem, I took no chances...a quarter seemed excessive but a dime was just right! :)


Here is the jacket on my paper-tape double...see how my left shoulder blade really sticks out? That makes it difficult to get my back shoulder width just right.   This jacket is 'almost' perfect...for a no-ease garment it is great.  But next time, I would prefer a bit more ease at bust and above, across the back.


Here are a few pictures of the top ON ME!  I felt like it looked good and made a good impression.  Though close-fitting, it was not so tight that I couldn't move, even with the camisole underneath.


At the Grand Reception...not everyone chose to dress semi-formally.  And there were no dress-police there to enforce the code!  But I was glad I looked appropriately attired, even if my hair DID look awful this whole trip!  sigh.

The fellow in the plaid shirt is the official photographer...he certainly didn't dress for the occasion!


Perhaps you can see a little tightness across the back? 
I think I would also lower the armhole just a tiny bit for the next one (in addition to adding a bit more bust/shoulder ease).


Ya know, on the MOG dress, I had made the shoulders TOO wide!  So, when I drafted the pattern for this top, I reduced the front and back shoulder widths...but apparently, I over-did it! 
Story of my life.
Next time...

Cheers!

Tuesday, April 30, 2013

MOG Dress Completion, and Accessories!

Now it was time to hem my MOG dress, but first I had to get some shoes.  I tried on every shoe in this city...even bought a few pair!  But nothing felt comfortable.  I couldn't imagine wearing any of these shoes all night, let alone dancing in them. 

I began wondering HOW on earth do those dancers on TV do it? 
Of course!  They wear DANCING SHOES!

So I got on the phone and called a dancewear store close to me.  Yep, they have dancing shoes IN STOCK.  So I  IMMEDIATELY drove over there. 

I tried on several styles...EVERY single shoe I tried on was MUCH more comfortable than ANY of the 'pretty' ones I had tried before.  Even the ones that were the wrong size were more comfortable!

These were not the prettiest, but they had a sole that could be worn outside (unlike the shoes for ballroom dancing, which have a soft sole).  The color was blah...tan...but I knew I could paint them any color I wanted!  Plus, my dress is full and long...how much would they really show? 
So I bought these:

Gorgeous, eh?


Once I took them home, I compared them to the pair of shoes I had already purchased.
Visually, there was no comparison...the dancing shoes were much wider and clunkier.  the other shoes were 'prettier'.  But...imagine...if that wide shoe fits, how in the world is my foot supposed to survive in the narrow, 'pretty' shoe?


I got out the masking tape and began taping the soles.

 
Then I started mixing paint!  I used Lumiere paints and mixed gold and silver to get an 'in-between' color.  Here you can see the painted shoe on the left and the unpainted one on the right.
 
 
But as you can see, the newly painted shoe doesn't match the 'pretty' shoe.  I kept painting. 

 
After a few days, I decided the shoes were STILL too gold for my taste, even though the dress DOES have a gold mesh underlayer in the bodice.  I really wanted them to be a bit more silver.  So I mixed paints again...this time using a Platinum color mixed with some gel medium to make it more translucent.  Better.  In this picture, the platinum color is the one in the center.

Then, in a moment of weakness, I decided to see what would happen if I rubbed SHOE POLISH on them to 'antique' these shoes, like the 'pretty ones'.  Well, duh!   These shoes don't have folds to hold the darker polish...they are smooth.  I quickly rubbed it off as best as I could and called the shoes DONE!

Oh, the 'pretty' shoes were returned to the store, unworn.

Now that the wedding shoes had been acquired, I could finally hem the MOG dress.  After it had hung for a while to let the bias skirt 'seek its place in the world', my sister came over and pinned up the hem for me...she is very good at that kind of stuff!

I hand-basted close to the folded edge, then marked a constant amount UP from the fold.


Next, I cut on that marked line, so that I would have an even hem allowance.

I decided to use hem lace on this hem...I wanted it to look nice but be very secure.  I didn't want it pulling out after accidently catching a heel on the hem! I found some purple hem lace in...where else?...my grandmother's stash!  But it wasn't quite enough to go all the way around the dress hem.  No biggie, I thought.  I'll go ahead and start sewing with this lace, then get some more in the morning when the stores open.

I soon realized that it was miles around this them!  But I sewed and sewed...using a herringbone stitch on TOP of the lace to make it lay very flat...hoping to make it less likely to catch on anything.

Then, in the morning, I left home to pick up some more purple lace.  Well, duh.  Have you tried to buy hem lace lately?  There are VERY few colors available, and that is *if* you can find the hem lace at all!  I had to buy navy blue...so part of my hem has purple lace and part has navy blue!  sigh.


I was reminded by friends that I might want to get a little purse to carry...something to put my phone (camera) in as well as a hanky.  Hmmmm....  that is not something I had thought about before.  But after shopping around town, I quickly realized that a) my taste exceeds my budget, and b) there is not much selection in this town!

One day I was prowling around in Kohls, looking for who knows what...when I stumbled upon this tiny little wrist purse.  It was exactly the color of my MOG dress!  So I had to buy it.
 

Once I got it home, I pried off that silly silver name on the front.


Then I used Glad Press 'n Seal and a Sharpie to make a pattern of that front area...


I used that pattern on a piece of the layered lace-mesh-satin fabric and cut a panel to cover the purse front.  I used hot glue to attach it!  Done.


Leave it to me to turn this wedding into one big craft project!

But it turned out fun and fine. 

Oh, BTW, the MOB decided she wasn't crazy about her teal dress, so she took it back and got a dark blue one.  I was worried that now mine might look too similar to hers...but since no one else seemed to care, I didn't either!  In the end, we coordinated! :)

 
The End.

Friday, April 19, 2013

MOG Dress Construction, Pt 1

I had a difficult time deciding on fabric to use for my MOG dress.  There was not a huge selection of fabric at my local Hancock Fabric stores...I visited 3 in my area, as well as the Joann's Fabric store!  I really wanted to use silk, but that was not to be, unless I wanted a pale oyster color (which Klassy Katz had!).  I did not want pale oyster or any other pale color.  After trying on a gazillion RTW dresses, I knew I needed a strong color....preferably a jewel tone. 

The MOB had a teal dress so I could not use that.

I finally settled on a polyester crepe-back satin from the BFF line (by Lauren Hancock). There was a coordinating lace, but it wasn't special...not reimbroidered or anything. But this was the best I could do locally and I had procrastinated too long to shop the internet and send off for samples...so I purchased this grape hyacinth-colored fabric.  

As I was trolling the aisles, hoping to stumble onto something better before I had this cut, I spied an odd mesh fabric...it was both purple and gold!  I wondered...what if?

So I bought some of that mesh fabric as well!  I decided to use it UNDER the lace...that way, the dress would have some sparkle without my having to add beads!


I cut each layer of the bodice separately...that is, I cut each piece from 3 different fabrics, one fabric at a time.

As you can see, I bought more than enough fabric...there is plenty of gold mesh left over for more fun things!

And when the lady cut my 3 yards of lace (I only really needed 1.5 but had allowed for experimentation), she used her 'gun' to scan the price on the bolt and said, "Do you know how much this lace is?"
Oh dear, I thought.  "Yes, it is $9.99, but on sale for 30% off."
She was shaking her head, no.  She stuttered a bit..."It is 21---er--"...pause (my heart fluttered...21?)..."seventy cents per yard."
Both of us were sure it was a mistake, but she said she couldn't change it.  I bought all 8 yards!  and for less than the regular cost of one yard!  So I have lots of lace, too!


Once the layers were cut out, I carefully aligned each one and glue-basted them together around the edges. This way, once the glue dried, it could be treated as one layer.


Here you can kinda get an idea of what this looks like once the fabrics are layered.  The gold mesh really added a richness that the lace alone lacked.

I don't know WHAT I will do with all the leftover lace!

Here are the bodice pieces, front and back, all lined up as they fit together.  The FRONT pieces are on top, and the BACK pieces at the bottom.

I serge-finished the edges of the vertical seams before sewing these pieces together.

Turns out, that was not necessary, and was actually not helpful, so much of it was eventually ripped out.


Once the vertical (princess) seams were sewn, the seam allowances were clipped and notched to allow for spread.  This made it easier to remove the unneccesary serger threads!

The bodice pieces went together fairly fast and smoothly.  Then it was time to work on the midriff section.  so back to the drawing board...er, drafting program! 


Once the pattern was made for the midriff, I started to work. I found this woven fabric in my stash of interfacings...I think it was originally purchased to make 'rangers' for jackets...you know, those two pieces of interfacing that encompass the back neck and shoulder and one armhole...they cross in back, giving support and movement.

Anyway, I decided it would be a good foundation layer for my midriff.


I cut my midriff pieces from the woven fabric, then marked and sewed the darts.


How funny it looks once the darts force it to take shape!


Now, at this point, I wasn't sure exactly HOW I was gonna get the midriff done.  I tried DRAPING the fashion fabric over this foundation...for about 27 seconds...!  t
Then I came to my senses!  I am a flat-pattern thinker...my brain just doesn't like to drape.


But then I got a wild idea.


WHAT IF I pleated the fabric BEFORE I put it on the foundation?

I have a pleater board that I made several years ago...it was a sewing guild project and we all made one.  So I pulled it out and set to work.


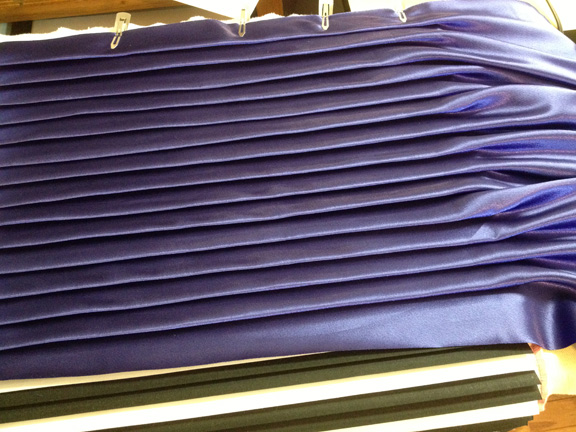
I put the right side DOWN toward the pleater board (I am using the crepe side, not the satin side, as my 'right' side) and began pushing the fabric under the 'lips' of the pleater board...skipping every other one.

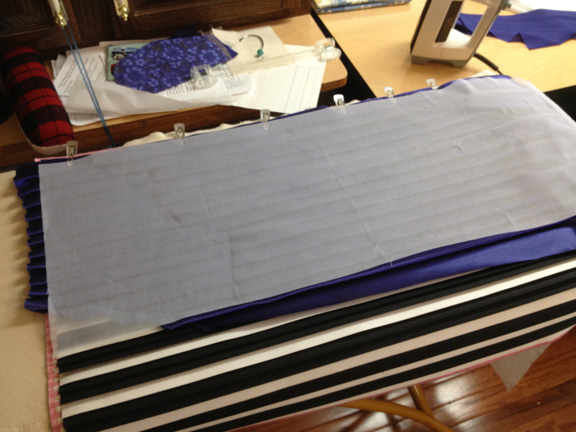
Then, I used an iron-on tricot interfacing and pressed it onto the fabric to hold the pleats in place.


I did a wide section for the front, then two smaller sections for each half of the back. 
This took A LOT of fabric!

Once I had my pieces pleated, I began to consider once again HOW I was going to attach this to the foundation.

uh oh.

Even though I had cut this fabric on the bias before pleating it...so it would have lots of 'give'...it was still NOT possible to force this pleated piece to have the same shape as the foundation pieces. 

Rats! 

No, the dart shaping had to be incorporated. 
I went back to the computer and created a new pattern piece for the pleated midriff.

Since the Empire waist was 3" above the waistline and the midriff extended 6" below the waistline, my midriff section was 9" tall.  I divided that into 6 equal parts...1.5" each.

Then I separated the sections and added folding lines, then closed the dart fragments in each section.


I ended up with two sections with opposing curves which would be joined at the waist.

So I cut these pieces from some more fabric...again, placing them on the bias...and began sewing these pleats in.  I folded on the fold lines, then basted on the pleat lines.  Once the pieces were pleated I began hand-sewing them to the foundation.

It was awful.  The bias stretched, causing weird bumps.

So I decided it couldn't be bias.  AGAIN, I cut new fabric to try anew.  I was worried that I might run out of fabric...and I had purchased THE WHOLE BOLT...there was nothing left at the store to go back and get should I run out!

This time I decided to pleat the fabric ONTO the foundation.  I aligned the top edges and pinned.  Then I sewed on the fold line, then folded the fabric upward and pressed...then basted on the pleat line, and sewed again about 3/16th" below that...so that once the basting was removed, the pleat would stay partially closed.  Then I would press the fabric downward again and sew on the next foldline...etc. 

Well, when I got the second pleat done, I realized that the FIRST pleat didn't measure 1.5" as planned.  It was only 1.25".  I decided NO BIG DEAL...I would make the second pleat 1.375", then the third and remaining pleats would be 1.5" and no one would know the difference.

Well, the math didn't work out that way.  once I got to the bottom, there was too much fabric for just one pleat, but not enough space for two pleats with the correct spacing.  I had to start over yet again!

Each time I started over, I had to cut a new foundation...because it wasn't worth ripping out all those pleats to salvage the foundation!

So once again, I pinned the top edge to the foundation and began pleating the fashion fabric to the foundation...this time MEASURING VERY CAREFULLY!  Each pleat was 1.5" wide.

Once the upper section was done, the lower section was begun.
I sewed the waist of the lower section to the waist of the upper section and continued with the pleating.


I even added my machine's quilting guide to help make sure that each pleat was precisely sewn!

Once the midriff sections were finally pleated, I could sew them each to their respective bodice piece. 

FINALLY, it was time to put in the zipper!  My choices were limited...the best color match was not an invisible zip, but in the end I decided to use the invisible one.

I put in the zipper, stopping the top about 7" below the neckline.  I wanted a slit in back but wanted it to be short enough that the dress would cover my bra band!

Once the zipper was in, I could finally sew all the bodice pieces together, front and back, and try this thing on!  Yay!

Well, not yay.  It was too 'blousey' under my bust!  Ugh! 

Even though I had sewn a trial muslin, it was NOT an Empire waisted one.  And we all know that an Empire waist fits more snugly around the ribs than a top with a 'regular' waist.  I was pissed.

Just like in that Pleated Dress I needed to make the waist dart wider at its upper end!  I could pinch out 0.5" under each princess seam at the Empire seam.

I took it apart.  I resewed the lower end of the princess seam (below bust point) to remove additional fabric (0.5"). 

Plus, I had allowed a 1" SEAM ALLOWANCE at the bodice Empire seam (just in case) and had decided I needed to use it all. Well, once the midriff was sewn to the bodice, I DID NOT need that extra!  It was too blousey in length under the bust as well!  so, I also removed this excess length from the front bodice at this time.

Then I looked at that midriff section that I had painstakingly pleated (ad nauseum)...I didn't cry, but I should have!  No, instead I began ripping. 

I ripped the waist seam and the seams holding the pleats ABOVE the waist.  I was finally able to remove the piece of fabric that was the upper front midriff.

I could easily sew the waist dart of the foundation piece larger...basically, it was correct at waist and below, but needed to be sewn straight up from waist to the Empire seam.

Well, think about this....if the dart is wider, that means the SHAPE of the pattern piece that represents the fashion fabric  has now changed, too! So I could NOT reuse the fabric...I had to (yet again) cut another piece of fabric for this upper front midriff section!  At this point, I am measuring to be sure there is enough left to cut a skirt!  There was...

So, I folded out the corrected dart on the pattern and cut the new piece.  Now, HOW am I gonna do this...since the midriff was initially formed by sewing the pleats from the top down?  Basically, I had to sew a lot of it by hand. 

Funny...after hand-sewing for a while, I was thinking to myself, 'this is so much more ZEN than shopping for a dress.'  But I had to laugh at this thought, because only a few hours earlier I wanted to tear my hair out!

I resewed the front midriff to the front bodice.  But remember? I had allowed that 1" seam allowance on the bodice that needed to be removed...ON THE BACK, TOO! 

So, now I had to RIP OUT THE INVISIBLE ZIPPER and remove the excess 3/8" length on the back bodice....then resew the bodice and midriff sections and reinsert that zipper.

Eventually I got the front and back put back together with the zipper in...and it fit!  Now it was time to draft the skirt...

To be continued.

 
Free Hit Counter