For some reason, my blog format changed between June and July. The stuff on the side...about me, my archives and blog list, etc...is all down near the bottom of the page, instead of all along the right of my posts, near the top. I don't know how it happened or how to make it go back to the way it was.
I hate this.
If you don't know what I'm talking about, scroll to the very bottom of this page. There you will eventually find the archives/list of previous posts. Choose one in June 2011...A Tale of Three T-Shirts, for example. Click on that one, then notice the overall look of the page. My 'stuff' is there on the right--right there at the top. No need to scroll down the whole page to find it.
But in the posts starting with the one in July, the stuff is at the bottom of the page.
I am wondering WHAT I did to make this happen...or did it happen without my help?
If you are knowledgeable in this area, please give me a clue, because currently, I don't have one!
Editted to add: When I viewed this post, the stuff was there, at the top! But as soon as I clicked on HOME, it went to the bottom again...arrrrrg!
Saturday, September 24, 2011
Monday, August 29, 2011
Loading the Quilt
I am ready to load my first quilt on my new longarm machine!
To begin, I piece together some fabric fto make a wide backing, then trim it to make sure it is 'square'.
I notch the center of the top and bottom edge of the backing fabric, which is loaded on the frame WRONG SIDE UP.
Then I align the center notch on the bottom edge with the center marking on the canvas leader for the backing...the lower of the two front poles. I am using corsage pins to pin the backing to the canvas leader, putting my pins parallel to- and equidistant from- the edge.

Both sides should be the same distance from the center. I found it easier to pin the center first, then measure out to the place on the canvas leader where the side of the backing should be and pin that, then pin from the outside in towards the center; then repeat on the other side. This way, I am assured that each side will be the same. (I plan to make some new leaders with a tape measure sewn right on, but until then, I use my measuring tape to be sure I haven't pulled or stretched either side when pinning.)

Once the bottom edge of the backing is pinned across the entire edge, I smooth out the backing fabric and begin to roll it onto the pole, using my hands to smooth out from the center as I roll, so that the backing fabric will not twist or skew.

I stop rolling before the entire backing is rolled up, because not it is time to attach the other end of the backing fabric to the take-up roller at the back.
 Again, the center notch on the edge of the backing is matched and pinned to the center mark on the canvas leader of the take-up roller.

I measure out to the half-width place and pin the corner, then work back toward the center.


Once the entire upper edge of the backing fabric has been pinned to the canvas leader of the take-up roller, I can finish rolling the backing fabric on the lower front roller.

You can see the seams where I pieced the backing...I hope they don't pose a problem for me!
 Now I put the clamps (two on each side) on the sides of the backing fabric to hold it taut.

 Because my machine does NOT have a channel-lock feature, I use clamps from the garage to stabilize the machine on the carriage; clamping in front and behind one wheel will prevent the machine from moving forward or backward, yet it can still move side to side along the frame.

Not pretty but it works!
 Now I set the batting, which is cut to the same size as the backing, onto the backing. I align the top edge with the edge of the canvas leader and smooth out the batting.

Using the basting stitch, I baste the top edge of the batting in place...the 'channel locks' enable me to move perfectly straight to the side, giving me a straight line of stitching.
 Now it is time to load the quilt-top. The top and side edges of my quilt are 'square' but the lower edge is not (intentially). Because I need a square/straight edge to pin to the leader, I fold up a little bit of the lower edge to provide a straight edge and pin it into place.
 Then I lay this quilt top onto the batting, aligning the center of the quilt top with the center mark on the canvas leader on the take-up roller. I align the upper edge with that straight line of basting that I just did...and pin.
 I pin the entire upper edge, again, making sure to keep each side the same width...the same distance from center.
 Once the upper edge is pinned in place, I begin pinning the lower edge. Just as before, the center of the quilt is aligned with the center mark on the leader.

I use a pin placed vertically to indicate the width on each side...pinning the edge at the center then at the side and working my way back to center.
 Both upper and lower edges of the quilt are pinnned in place but they are not rolled up yet...the top is just kinda piled there.
 I move the clamps that I placed on the carriage, scooting them forward about 1/4" to allow the machine to again sew a straight line across, but this time, slightly farther forward from the roller. This enables me to baste the upper edge in place through all layers.
 I also baste down each side for a distance...that will have to be repeated each time the quilt is progressed on the frame.
 Now I am ready to begin quilting!
To begin, I piece together some fabric fto make a wide backing, then trim it to make sure it is 'square'.
I notch the center of the top and bottom edge of the backing fabric, which is loaded on the frame WRONG SIDE UP.
Then I align the center notch on the bottom edge with the center marking on the canvas leader for the backing...the lower of the two front poles. I am using corsage pins to pin the backing to the canvas leader, putting my pins parallel to- and equidistant from- the edge.

Both sides should be the same distance from the center. I found it easier to pin the center first, then measure out to the place on the canvas leader where the side of the backing should be and pin that, then pin from the outside in towards the center; then repeat on the other side. This way, I am assured that each side will be the same. (I plan to make some new leaders with a tape measure sewn right on, but until then, I use my measuring tape to be sure I haven't pulled or stretched either side when pinning.)

Once the bottom edge of the backing is pinned across the entire edge, I smooth out the backing fabric and begin to roll it onto the pole, using my hands to smooth out from the center as I roll, so that the backing fabric will not twist or skew.

I stop rolling before the entire backing is rolled up, because not it is time to attach the other end of the backing fabric to the take-up roller at the back.
 Again, the center notch on the edge of the backing is matched and pinned to the center mark on the canvas leader of the take-up roller.
I measure out to the half-width place and pin the corner, then work back toward the center.


Once the entire upper edge of the backing fabric has been pinned to the canvas leader of the take-up roller, I can finish rolling the backing fabric on the lower front roller.

You can see the seams where I pieced the backing...I hope they don't pose a problem for me!
 Now I put the clamps (two on each side) on the sides of the backing fabric to hold it taut.
 Because my machine does NOT have a channel-lock feature, I use clamps from the garage to stabilize the machine on the carriage; clamping in front and behind one wheel will prevent the machine from moving forward or backward, yet it can still move side to side along the frame.
Not pretty but it works!
 Now I set the batting, which is cut to the same size as the backing, onto the backing. I align the top edge with the edge of the canvas leader and smooth out the batting.
Using the basting stitch, I baste the top edge of the batting in place...the 'channel locks' enable me to move perfectly straight to the side, giving me a straight line of stitching.
 Now it is time to load the quilt-top. The top and side edges of my quilt are 'square' but the lower edge is not (intentially). Because I need a square/straight edge to pin to the leader, I fold up a little bit of the lower edge to provide a straight edge and pin it into place.
 Then I lay this quilt top onto the batting, aligning the center of the quilt top with the center mark on the canvas leader on the take-up roller. I align the upper edge with that straight line of basting that I just did...and pin.
 I pin the entire upper edge, again, making sure to keep each side the same width...the same distance from center.
 Once the upper edge is pinned in place, I begin pinning the lower edge. Just as before, the center of the quilt is aligned with the center mark on the leader.
I use a pin placed vertically to indicate the width on each side...pinning the edge at the center then at the side and working my way back to center.
 Both upper and lower edges of the quilt are pinnned in place but they are not rolled up yet...the top is just kinda piled there.
 I move the clamps that I placed on the carriage, scooting them forward about 1/4" to allow the machine to again sew a straight line across, but this time, slightly farther forward from the roller. This enables me to baste the upper edge in place through all layers.
 I also baste down each side for a distance...that will have to be repeated each time the quilt is progressed on the frame.
 Now I am ready to begin quilting!
Wednesday, August 24, 2011
New Project, part two
This is how the quilt looked after all the blocks were sewn together.
 Some people who saw it thought it was a sunset...some thought it was mountains out west.
I am calling it "My Place or Yours".
I wanted to add a band of flying geese across the upper part. So I layed a piece of exam table over the quilt and drew a curve, erasing and redrawing until I got it to suit me. Then I removed the quilt and refined the curve, adding a second line to form the other edge. I added vertical sections and drew in triangles...geese.
Then I cut this into manageable sections and began paper piecing.
 The narrow sections were the hardest, as the pieces were so small. Who thought this was a good idea? Hmmmm...yep, that would be me. sigh.
 The wider areas went fast and were no problem.
 After seveal days of working on this (on and off) the string of geese was complete!

Now it was time to trim the edges and remove the paper from the back...always fun!

I pinned the geese to the quilt top, auditioning fabrics to use along the edge. Initially, my plan was to put a narrow piping along the edge of the geese...this would make it easier to attacch to the base. I decided on a dark red/maroon fabric and cut a strip, slipping in behind the geese. Here it is only on one side, either the top or the bottom, depending on the curve, and it doesn't really go across the whole thing (it is just a sample).
 I tried putting the strip along BOTH edges of the geese (far right).
 This went on for hours...on with the strip of dark red...off with the strip...moving it here or there. Eventually, I decided I really preferred the geese WITHOUT the strip, so no piping will be added. That will make application a little tougher, but I can do it.
  The bottom edge is NOT square but is curved...like a ~ (only backwards!). I did that on purpose, but will probably need to add a strip of temporary fabric to the bottom so I can square it off so that I can load it onto the quilting frame to quilt!
 Thursday, August 18, 2011
New Project
While cleaning and sorting through my stuff, I came across a bundle of fabric that was purchased this year at Paducah. It was a roll of fabric that was in a brown paper sack and only the outer fabric was visible. Like buying a pig in a poke...
Anyway, I had purchased this bundle because the outer fabric was part of a collection I was using on a quilt and I had hoped it would have other pieces of the same collection inside. No such luck! but the fabrics were nice enough...just not part of the collection I had hoped for.
 Once completed, the first row looked like this:
 For the second row, I decided to make it a bit scrappier, and intentionally mixed up the wedges so that I would NOT end up with a row of a single fabric across the 6 blocks (this later turned out to be a mistake, but I didn't now it then).
 I pulled other fabrics out of my stash to be used also, transitioning from orange to browns then greens then blues.
 After completion of the 3rd row, it looked like this:
 As you can see, the blocks are not sewn together, but are just pinned to a cardboard cutting mat...I don't yet have a real design wall.
 I decided to rip and rearrange some of the wedges on the lower portion of the second row...the browns...to make a better transition. So much for the 'scrappy' look that I had intentionally done! No, I was much more satisfied with the look when the pieces were placed according to choice (as opposed to randomly).


 Posts
All Comments
Posts
All Comments
Posts
All Comments
Posts
All Comments
Anyway, I had purchased this bundle because the outer fabric was part of a collection I was using on a quilt and I had hoped it would have other pieces of the same collection inside. No such luck! but the fabrics were nice enough...just not part of the collection I had hoped for.
 So I began looking at these fabrics...sorting and putting them in order. I noticed a bunch of oranges. Hmmmmm... Didn't I also have another bundle of orange strips that had been given to me? Yep. I pulled them out too and began cutting the strips into wedges.
 I had purchased a box of wax paper sheets at my local Sam's Club...these are for wrapping deli sandwiches, but to me, they seemed perfect for paper/foundation piecing! I began sewing the wedges to the wax paper sheets, starting with the one pink fabric and moving to the more red colors before using the oranges.
 Once completed, the first row looked like this:
 For the second row, I decided to make it a bit scrappier, and intentionally mixed up the wedges so that I would NOT end up with a row of a single fabric across the 6 blocks (this later turned out to be a mistake, but I didn't now it then).
 I pulled other fabrics out of my stash to be used also, transitioning from orange to browns then greens then blues.
 After completion of the 3rd row, it looked like this:
 As you can see, the blocks are not sewn together, but are just pinned to a cardboard cutting mat...I don't yet have a real design wall.
I wasn't exactly thrilled with the way this was looking....the browns were all jumbled up where they met the oranges... there was no smooth transition.
I rearranged some of the blocks in that second row. Hmmm.... ok, better, but still not great.
 I decided to rip and rearrange some of the wedges on the lower portion of the second row...the browns...to make a better transition. So much for the 'scrappy' look that I had intentionally done! No, I was much more satisfied with the look when the pieces were placed according to choice (as opposed to randomly).
Now, this was better.
 I began sewing the blues, although at this point, I kinda liked it 'as is'...without any blue... but I continued making blocks.
 Once the entire 4th row was finished, I was glad I had continued...the blues looked good.

 I began sewing the blues, although at this point, I kinda liked it 'as is'...without any blue... but I continued making blocks.
 Once the entire 4th row was finished, I was glad I had continued...the blues looked good.

Now on to row 5! As I layed these out, again, I was tempted NOT to sew them, thinking it was good enough already. But the wedges were cut and layed out in order...I might as well sew them.


Once the 5th row was added, I was ok with the blues, but the 2nd row was still bothering me!
I finally decided to rip and rearrange several of those random oranges in that second row. Here you can see the before and after...not a huge difference, but I was more pleased. There was one particular orange fabric that seemed out of place, and it appeared in every blockk in the row. it was removed entirely.
I finally decided to rip and rearrange several of those random oranges in that second row. Here you can see the before and after...not a huge difference, but I was more pleased. There was one particular orange fabric that seemed out of place, and it appeared in every blockk in the row. it was removed entirely.
The blocks on the left haven't been joined together yet, but the blocks on the right have, so that does make a little difference in how they look as well!
PLUS, on the right, you might notice that I added another pink as well as a pale lilac to the upper edge. The pink on the top really bothered me and I considered cutting it off, but then I decided what it really needed was MORE pink! I wish I had had a large piece of that lilac, but that was all I had. Perhaps I'll find more.


Once I was pleased with the blocks, I began joining them into columns. My original plan was to cut each block to the same size, and there would be horizontal as well as vertical seams between each block---but I ended up joining the blocks (vertically) using the wedge angles so the horizontal seams are not really visible... they look just like all the other wedge seams! The vertical seams that join each column will be visible, however.


Once the blocks were joined, the strips were trimmed along the edges to make each column the same width.

I joined the strips ONLY as far down as the 'horizon'...where the green fabric met the blue.


I joined the strips ONLY as far down as the 'horizon'...where the green fabric met the blue.
I wanted the blue area to have a straight horizontal seam, like the surface of the water, so I sewed the upper blocks together using the wedge angles UNTIL I came to the bottom of the green fabric. Then I squared off the lower edge.
The lower (blue) blocks were also joined to each other using the wedge angles. But I squared off the upper edge of the blue sections so that when the upper strip was sewn to the lower (blue) strip, each column would have a horizontal seam there. Then, when each completed column was sewn to the next, the horizontal seams created a 'water level'. Or at least, that was my plan!

Stay tuned for part two.
Wednesday, August 10, 2011
Tiered-Flounce Top
This Spring I bought a top that I really liked. It was a tiered-flounce top from Coldwater Creek. It only came in two colors and I wasn't crazy about the other color they offered, so I decided to try to make myself another one by copying it. It seemed like it would be fairly easy to do...after all, it appeared that it was just a bunch of strips of fabric sewn to a knit base. Kinda.
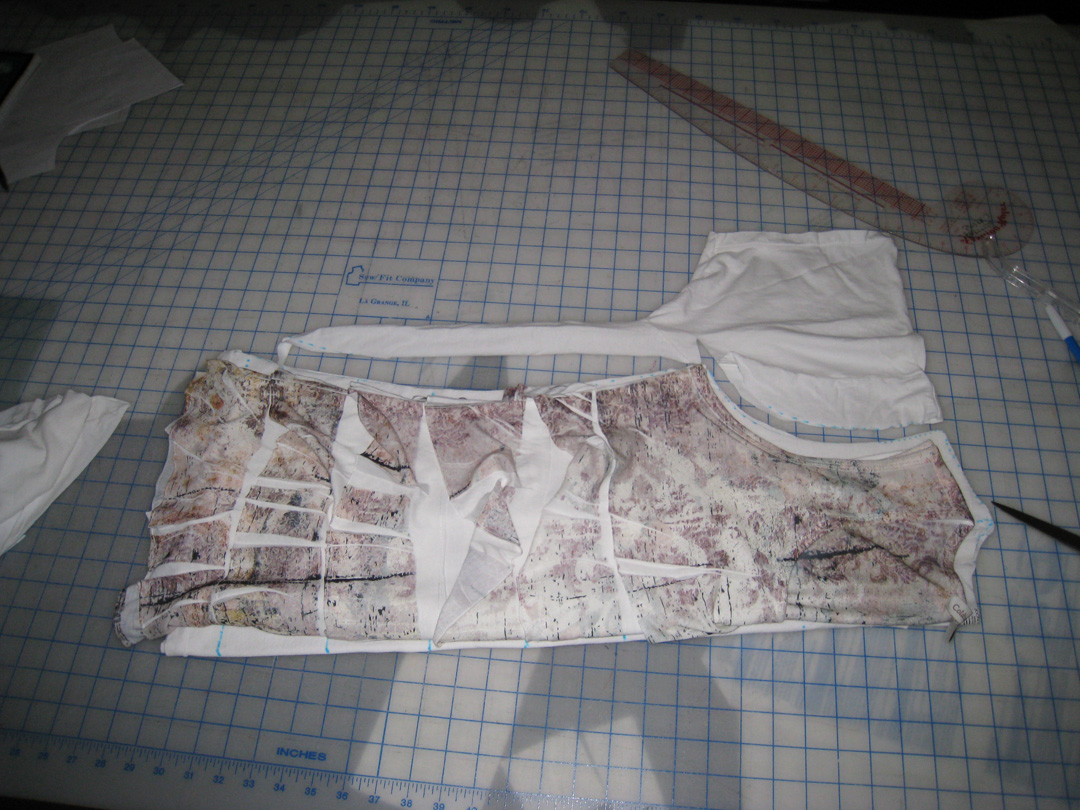
 For my base, I found a men's XL T-shirt that was willing to be sacrificed...I mean, 'improved'. I straightened it out and folded it in half lengthwise. Then I did the same to the flounce top, which I layed on top of the men's T-shirt, aligning the center folds. Then, using my rotary cutter, I cut all around the outside of the top, leaving about a .5" seam allowance. I wasn't exact.
 I cut the neckline for the higher BACK neck, but drew on the front neck, to be cut later (single layer). I also marked where the tiers should go.
Then I put this new 'base' onto a doubled sheet of paper and cut it again, so I'd have a paper pattern. I used ONE of the copies to create the tiers...I cut it apart on the lines I had drawn. To add flare to the tiers, I just slashed each one in several places and spread them open as I layed them on the fabric...I didn't bother to insert paper into the openings, as this wasn't a top I planned to make more than once.
 Here you can see where I have spread the top tier...the one that includes the neck and shoulders. I was really just guessing at how much I should add...I wasn't even sure the original was flared! But this one would be.
Before I started cutting fabric, I suspected that I wouldn't have enought fabric...actually, I KNEW I wouldn't have enough! But I cut anyway...as if cutting would somehow create MORE fabric!
duh...
Sure enough, there was not enough fabric to cut all the tiers.
I went back to the store where I'd bought the fabric originally, but it had been many months and I didn't hold out much hope.
They didn't have any more.
But they did have this black and white spotty print and it was kinda neat so I got some of that to mix in.
I used my serger to put a lettuce-edge on the tiers, and used my coverstitch machine to attach them to the base fabric. Once all the tiers were added to the front and all the tiers were added to the back, I sewed the front and back together.
The neck and armhole edges were turned and coverstitched. I did trim away the base fabric in the neck and armholes so it wouldn't get too thick there.
Taking pictures of this top has been a trial! I have tried several times, and have yet to get any good ones! Sigh. I'll just share these...


Subscribe to:
Comments (Atom)
About Me

- Trish
- I pretty much color inside the lines. Sometimes I even make the lines bolder, so as to emphasize the lines when coloring. I'm trying to get over that.
My Blog List

