Showing posts with label hand-dyed fabric. Show all posts

Sunday, April 11, 2010

Puzzle swap

After visiting this blog, I suggested to my Fiber Arts group that some of us might wish to do a similar swap. Well, surprise, surprise...Fourteen ladies wanted to participate!


We set the first Monday of April as the day of the swap...this was decided back in January.
However, the community center where we meet decided to close that Monday (MLK day) so we will swap these tomorrow...on the 12th of April.


I finished my pieces in March, but needed to keep them secret until now!

Remember when the Carol Duvall Show was on HGTV? She had a variety of guests demonstrating a variety of crafts and usually there was SOMETHING on each show that I enjoyed and wanted to try.

One of these demonstrations was origami using fabric.

The guest, Rebecca Wat, had published a book called Fantastic Fabric Folding and she demonstrated this one little flower. I followed along and folded a flower using a piece of paper.

I have kept it all these years. I decided THAT would be the theme of my puzzle pieces!


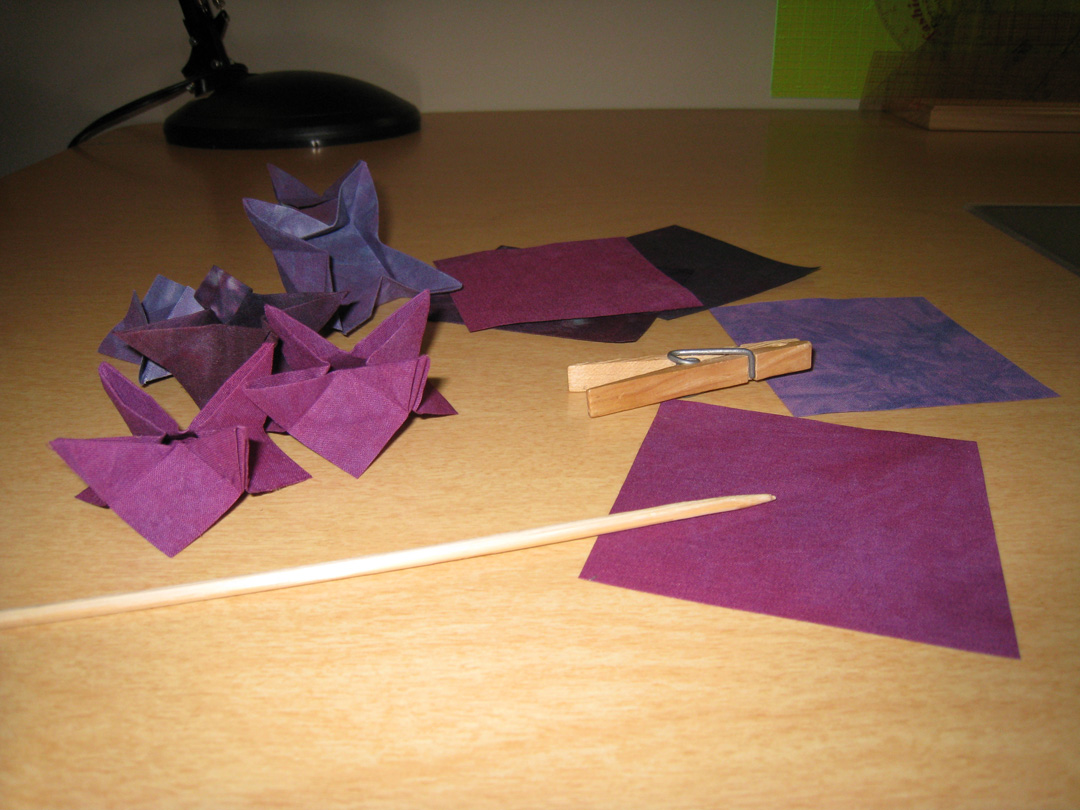
The first few flowers I made used the light pink fabric, and I used the iron to set the creases...but I decided the fabric would perform much better if it was starched...and my fingers would appreciate not getting burned! So I mixed up some boiled starch and drenched the remaining fabrics then ironed them flat and stiff.

Then I cut the fabric into squares. I wasn't particular about the size of the squares, making a variety to fit my scraps. After all, there weren't going to be sewn together, so the squares could be different sizes.

I folded the purples, pinks and magenta squares back and forth, just as I had done with the paper 'sample flower' I had saved all these years. It worked in fabric, too!

Next I rounded up some of the blue/green scraps of hand-dyed fabric left over from "Shoulda Putta Frog on it" (a.k.a. the Blue River Quilt) as well as some additional fabrics to use for the background.


Once the flowers were made, I attached the blue and green scraps 'log-cabin style' to the flower center. The object of the game was to get a background large enough to fit the puzzle piece template onto.


I layered these pieces onto some off-white felt and stitched the background...mostly stippling, although I experimented with other stitch patterns at first (the stippling looked best!). Then I used my puzzle template to mark these pieces. I had downloaded the puzzle piece used by this blog and shared it with the other participants in my group. One of the ladies in my group had laminated this and cut the pieces apart to provide each of us with a laminated puzzle piece to use as a template for drawing around...a nice help! Then I cut out the pieces using scissors. More than once I thought how nice a die-cut machine would be!


To give them a nice backing, I used Wonder Under to attach TWO layers of sew-in interfacing, then cut them into squares and painted them with acrylic paint. Once dry, I used the template to mark and cut these into puzzle shapes also. These were them paired with the pieced puzzles...I glue-basted them together, then stitched around the edges with variegated thread.

This is my final product!


I made 17 pieces, although I only needed 14. I wanted to have a few extra in case I messed up!


The hardest part was cutting these out. That is why I cut the top and backing separately...I had tried basting the top to the backing BEFORE cutting on 3 of them and was SO glad that I stopped to test the cutting before sewing them ALL together! It was easier to cut twice as many thinner ones than half as many thicker ones!


I have a variety of colors and flower sizes. The hand-dyed fabrics make nice things! I think I will have to start dying fabric...it is so much fun to use this stuff!


The tabs don't all interlock, but that is to be expected. Even if they did, once swapped, will mine interlock with those of others? Who knows! I will show you the result of the swap later...check back!


Monday, January 11, 2010

The blue river quilt (still?)

I haven't talked about the blue river quilt lately. You remember, the the art quilt I have been working on for a year and a half! I finished the quilting on it last February (2009) and began embellishing it.

First, I did some big stitches on the trees with pearle cotton.


I hated it! So I ripped it out.


This is how the piece looked after quilting at the beginning of the embellishment stage, with only that one tree done, and even that one was later 'undone'. The colors here look odd, though!


Next I tried just stitching on ONE side of the trees and I liked that better.


I applied beading along the rays of the sun and various other places. This took months, as I generally only worked on this on Mondays, and not every Monday at that!


When I was trimming the quilt after the initial line of stitching to put on the binding, I accidently cut off a corner of the binding. Arrrgh!


*
*
*
*
*
*
*
*
*
*
*
*


This was supposed to be a continuous binding atround this corner, not one that starts and stops! It is NOT supposed to have two halves! So I had to rip off a big section of the binding and make a new section for that corner. Fortunately, the binding was pieced from a variety of pieces anyway, so this won't be seen as a mistake.


*
*
*
*


This is how the quilt looked in October of 2009...I was trying so hard to call it finished!

I sewed with pearle cotton...I ripped out pearle cotton.

I sewed on beads...I took off beads.

SOMETHING about it still bothered me, but I was so sick of looking at it that I just put it away and called it 'done'.

*
*
*
*
*
*
*
*
*
*


This is the lower half of the quilt...this is the area that bothered me the most. In addition to being so much lighter in color than the majority of the background, the piecing was also 'chaotic'...seams going in all directions...as opposed to neat and orderly like the seams in the upper areas of the background. Plus, the leaves and flowers in this lower area were stylistically different from the background trees. At first, I liked that, but it later began to bother me.

I had tried scattering beads along the river bank, like flotsom and jetsom, but that didn't give me the satisfaction I hoped for!

Even the cute turtle bead was later removed.


So I decided to paint the background of the lower right section! (what?)


First I used a very watered-down solution of DynaFlow to darken the light areas a bit. Better, but not enough.

I used some colored pencils and crayons to color in the quilting, to see if I might want to REALLY do some painting...with Shiva paintstiks. I decided that, NO, that wasn't the look I was after either.

By now, it is 2010, so the label on the back that says this was finished in 2009 will certainly have to be changed!


I recently decided that the way to fix this quilt was to whack off the lower part! Now, this was a difficult decision. I have never done anything like this before and was not sure whether or not I would ruin the whole thing by doing this!

But I did it. And it wasn't too bad...not too hard! I ripped some of the binding on each side then cut the quilt off where desired...then I rebound the lower edges on each side of the 'river'. Since I didn't want binding around the river itself, I undid some of the quilting in that area so I could turn under the cut edges of the quilt and the background and slipstitch them together for a clean edge. Then I reapplied the fuzzy yarn that surrounds the river edge (also by hand).

I removed the remaining pearle cotton stitches in those upper trees and added beads instead, also beading the remaining trees that were 'beadless'.

Now all trees had beads...it made more sense.


Then I decided to add beads to the water! I beaded for about an hour and (at left) is what I had:


I hated it. I was about to rip it out when I talked myself into waiting...telling myself , "Perhaps do a little more and then you'll like it."

So I did more.

I worked on this quilt for 4 days last week...or was it 5 days? It was ALOT! But I was more pleased with the overall result at this point and was trying so hard to get it finished!

Until I began beading the river, that is!
*
*
*
*
*
*
*
*
*
*


I had purchased several types of beads, since there was no pre-mixed packagesin the colors I needed at my local Hobby Lobby. I even got some sequins, just to jazz it up a bit!


*


This is where it stands today...Monday afternoon.

I am once again NOT pleased.

I think the beading on the water is NOT good....not a good thing.

I am pretty sure I liked it better without any beads on the blue water.

I am CERTAIN that I want to remove the small, 'S' shaped cluster near the bottom...but nearly as sure of removing them all.


I am forcing myself to sleep on it.

Tuesday, March 10, 2009

Tastes like Chicken


It was about this time last year that my I first visited with the fiber arts group that I am now a part of. My friend, Marilyn, had mentioned this group several times, and finally I decided to go see what they were all about. It was basically a group of ladies who showed up whenever, and worked on whatever...each doing her own thing, and yet each being creative! I went home so inspired!

That very day, I went to my stash and started pulling out UFOs. I had a bunch of orphaned 4-square blocks that didn't match anything or each other, so I sewed them all together. Then I grabbed a couple of boxes of Rit dye from the laundry room and started mixing and cooking!

I put this assembled quilt top into a brown dye bath. Meanwhile, I also mixed up a green bath...and threw in several fabrics from my stash. I wanted to make a frog, and I had no frog-appropriate fabrics...so I tried to create something. I was planning this quilt for my son, Kevin, who used the knickname "Toad" during his paintball career throughout high school!

Once the quilt top was dried, I pulled out some fabric paint and stencilled on the willow tree, moon, fleur de lis and the squirls (behind the dragonflies). I stencilled a bit of lattice design behind the frog (in brown) but determined that particular paint was too runny and thin for stencilling...it was bleeding...so I stopped.

I created a frog 'stamp' by stacking and glueing several frog-shaped foam cutouts onto a scrap of wooden flooring...I used this to stamp gold frogs in a checkerboard design across the bottom. And I put a tiny orange 'T' in one square...University of Tennessee is where Kevin is attending Pharmacy school, and orange is their color!

That was all the painting I did at that time. Then I worked on adding the frog.


The frog was drawn with pencil on the fabric that I dyed, then cut out and appliqued to the quilt. There is a couple of layers of flannel behind him, plus I ran a bit of yarn down his stripe (trapunto) to give it a bit of definition. The back toes ( and front 'thumb') were bias strips, added individually.


I'll show a close up of the frog's eye...it was a plastic alphabet 'bubble' sticker...the letter 'O'...and I colored a pupil on the backside of it with a black sharpie marker before using it. I made tiny bias strips of my fabric and sewed them on (by hand) to form the eyelids.


After the frog was applied, I layered this up (batting and backing) and loaded it up on my Handiquilter, to be quilted. I used various threads for the quilting...variegated brights in the center, variegated blues for the sky and water area, black for rocks, greens for leaves, gold around the fleur de lis and moon.


Then I made the dragonflies. Their bodies were little tubes of shiny polyester fabric, stuffed and wrapped and shaped and stitched...with beads as eyes. Their wings took weeks to make, and there were MANY *rejects* before settling on these! In the end, though, the wings I used were made from Angelina fibers that were fused into a 'sheet', then layered between black tulle, along with some gold threads, and stitched, then cut out. They were sewn to the bodies then the whole dragonflies were attached to the quilt...the wings were shaped to give a 3-D effect.

Next, I added a few colored seed beads...randomly...on the quilting lines in the dragonfly area. These are to imply tiny gnats or other bugs buzzing around in the night air!
I applied hot-fix crystals to the upper area to be the stars.

Lastly, I again painted...this time, inside some of the already quilted areas. I used acrylic paints...like Folk-Art and CeramCoats...to set off these areas, as the Dynaflow fabric paint was too intense and difficult to control, as I wanted a subtle coloring. The last part I did was the water, and I did use some Dynaflow, and it turned out more intense than I wanted, but HEY, whatcha gonna do? It wouldn't wash out.

So it was finished.

I sewed on the label on the back...

"Tastes Like Chicken"
2008


Saturday, January 24, 2009

Blue River Quilt part 3

A while back, I was reading Myrna's blog and she was talking about choosing colors for her quilt by photographing them and looking at them in gray scale. I began to wonder how MY piece would hold up to critique in gray scale.


It DOES have the desired value shift that I was after, transitioning from dark in the upper left to light in the foreground. I was surprised, though, at the way some of the 'trees' just blended right in to the background! This is not evident in the colored version, which IS, after all, the real thing! Overall, I am pleased with the choices.


I'm in the quilting stage now, but thread selection is my hold-up. I had good results with some Madiera POLY NEON thread, but the variegated Sulkys gave me trouble...the thread kept breaking, plus, when I went to rip out the stitching, I could pull hard on the bobbin thread and it would 'break' the top threads, allowing me to basically rip out the whole seam by pulling on the bobbin...not slipping out from under the loops, but actually pulling the top thread down and breaking it!! No, the Sulky is not strong enough. I must go find other threads before I can progress.


I drew lines on the quilt top to create sections to stitch within. I haven't worked out all the areas yet, so I stitch only where I have decided what to do!


The long thread tails will be threaded onto a needle and pulled in between the layers to eliminate them, as opposed to just cutting them off.

I used a basting spray to temporarily attach the 3 layers, then loaded it onto 2 of the 3 poles of the HandiQuilter frame. This way, I can stitch across the full width of the piece, going back and forth as the design requires, instead of stitching in long narrow strips from top to bottom.

Thursday, January 1, 2009

Blue River Quilt

Happy New Year!

This is what I have been working on lately, on and off. It began with the blue 'river' and has grown from there. Like the river, I paper-pieced the various leaves, trees, etc, and am now in the process of filling in the blanks between them. However, I have hit a snag. I am running out of fabric!

I obtained the fabric for this background from my friend, Marilyn...it was some of her hand-dyed scraps from previous projects. She had given me several large ziplock bags of scraps which I sorted through, picking out the blues and greens, etc., that I could use to go with the existing river. Well, duh...the river is big! That means I need LOTS of background to put it on!

But really, I just wanted to put up a TEST post. I have been ticked off, because the recently-posted pictures on my blog are NOT showing a larger version when you click on them. My pictures DID do this in older posts...you could click on any picture for a larger image. But not lately. I cannot figure out WHAT I am doing wrong! Any hints?

Ok, see? This one WILL will show a larger image! So why won't the ones in my last few posts show larger images? I am so green.

 
Free Hit Counter