The MOB had a teal dress so I could not use that.

As I was trolling the aisles, hoping to stumble onto something better before I had this cut, I spied an odd mesh fabric...it was both purple and gold! I wondered...what if?
So I bought some of that mesh fabric as well! I decided to use it UNDER the lace...that way, the dress would have some sparkle without my having to add beads!
 I cut each layer of the bodice separately...that is, I cut each piece from 3 different fabrics, one fabric at a time.
As you can see, I bought more than enough fabric...there is plenty of gold mesh left over for more fun things!
And when the lady cut my 3 yards of lace (I only really needed 1.5 but had allowed for experimentation), she used her 'gun' to scan the price on the bolt and said, "Do you know how much this lace is?"
Oh dear, I thought. "Yes, it is $9.99, but on sale for 30% off."
She was shaking her head, no. She stuttered a bit..."It is 21---er--"...pause (my heart fluttered...21?)..."seventy cents per yard."
Both of us were sure it was a mistake, but she said she couldn't change it. I bought all 8 yards! and for less than the regular cost of one yard! So I have lots of lace, too!

 Here you can kinda get an idea of what this looks like once the fabrics are layered. The gold mesh really added a richness that the lace alone lacked.
I don't know WHAT I will do with all the leftover lace!

I serge-finished the edges of the vertical seams before sewing these pieces together.
Turns out, that was not necessary, and was actually not helpful, so much of it was eventually ripped out.

The bodice pieces went together fairly fast and smoothly. Then it was time to work on the midriff section. so back to the drawing board...er, drafting program!

Anyway, I decided it would be a good foundation layer for my midriff.


How funny it looks once the darts force it to take shape!
Now, at this point, I wasn't sure exactly HOW I was gonna get the midriff done. I tried DRAPING the fashion fabric over this foundation...for about 27 seconds...! t
Then I came to my senses! I am a flat-pattern thinker...my brain just doesn't like to drape.
But then I got a wild idea.
WHAT IF I pleated the fabric BEFORE I put it on the foundation?
I have a pleater board that I made several years ago...it was a sewing guild project and we all made one. So I pulled it out and set to work.
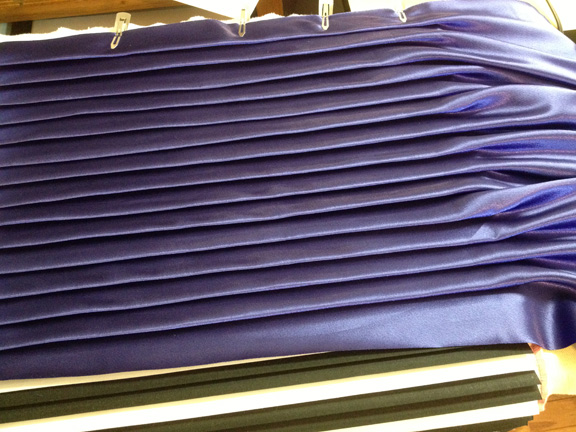
I put the right side DOWN toward the pleater board (I am using the crepe side, not the satin side, as my 'right' side) and began pushing the fabric under the 'lips' of the pleater board...skipping every other one.
Then, I used an iron-on tricot interfacing and pressed it onto the fabric to hold the pleats in place.
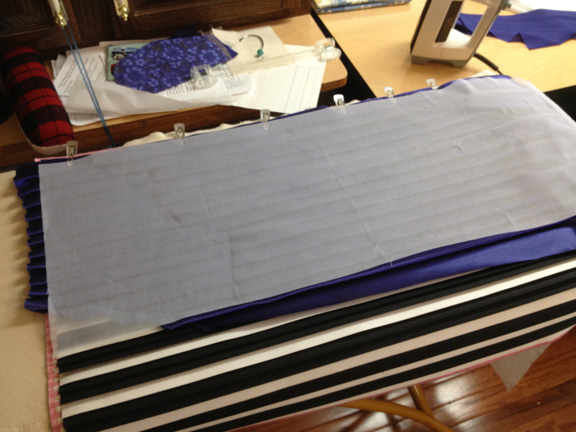
I did a wide section for the front, then two smaller sections for each half of the back.
This took A LOT of fabric!
Once I had my pieces pleated, I began to consider once again HOW I was going to attach this to the foundation.
uh oh.
Even though I had cut this fabric on the bias before pleating it...so it would have lots of 'give'...it was still NOT possible to force this pleated piece to have the same shape as the foundation pieces.
Rats!
No, the dart shaping had to be incorporated.
I went back to the computer and created a new pattern piece for the pleated midriff.

Then I separated the sections and added folding lines, then closed the dart fragments in each section.
I ended up with two sections with opposing curves which would be joined at the waist.
So I cut these pieces from some more fabric...again, placing them on the bias...and began sewing these pleats in. I folded on the fold lines, then basted on the pleat lines. Once the pieces were pleated I began hand-sewing them to the foundation.
It was awful. The bias stretched, causing weird bumps.
So I decided it couldn't be bias. AGAIN, I cut new fabric to try anew. I was worried that I might run out of fabric...and I had purchased THE WHOLE BOLT...there was nothing left at the store to go back and get should I run out!
This time I decided to pleat the fabric ONTO the foundation. I aligned the top edges and pinned. Then I sewed on the fold line, then folded the fabric upward and pressed...then basted on the pleat line, and sewed again about 3/16th" below that...so that once the basting was removed, the pleat would stay partially closed. Then I would press the fabric downward again and sew on the next foldline...etc.
Well, when I got the second pleat done, I realized that the FIRST pleat didn't measure 1.5" as planned. It was only 1.25". I decided NO BIG DEAL...I would make the second pleat 1.375", then the third and remaining pleats would be 1.5" and no one would know the difference.
Well, the math didn't work out that way. once I got to the bottom, there was too much fabric for just one pleat, but not enough space for two pleats with the correct spacing. I had to start over yet again!
Each time I started over, I had to cut a new foundation...because it wasn't worth ripping out all those pleats to salvage the foundation!

Once the upper section was done, the lower section was begun.

 I even added my machine's quilting guide to help make sure that each pleat was precisely sewn!
FINALLY, it was time to put in the zipper! My choices were limited...the best color match was not an invisible zip, but in the end I decided to use the invisible one.
I put in the zipper, stopping the top about 7" below the neckline. I wanted a slit in back but wanted it to be short enough that the dress would cover my bra band!
Once the zipper was in, I could finally sew all the bodice pieces together, front and back, and try this thing on! Yay!
Well, not yay. It was too 'blousey' under my bust! Ugh!
Even though I had sewn a trial muslin, it was NOT an Empire waisted one. And we all know that an Empire waist fits more snugly around the ribs than a top with a 'regular' waist. I was pissed.
Just like in that Pleated Dress I needed to make the waist dart wider at its upper end! I could pinch out 0.5" under each princess seam at the Empire seam.
I took it apart. I resewed the lower end of the princess seam (below bust point) to remove additional fabric (0.5").
Plus, I had allowed a 1" SEAM ALLOWANCE at the bodice Empire seam (just in case) and had decided I needed to use it all. Well, once the midriff was sewn to the bodice, I DID NOT need that extra! It was too blousey in length under the bust as well! so, I also removed this excess length from the front bodice at this time.
Then I looked at that midriff section that I had painstakingly pleated (ad nauseum)...I didn't cry, but I should have! No, instead I began ripping.
I ripped the waist seam and the seams holding the pleats ABOVE the waist. I was finally able to remove the piece of fabric that was the upper front midriff.
I could easily sew the waist dart of the foundation piece larger...basically, it was correct at waist and below, but needed to be sewn straight up from waist to the Empire seam.
Well, think about this....if the dart is wider, that means the SHAPE of the pattern piece that represents the fashion fabric has now changed, too! So I could NOT reuse the fabric...I had to (yet again) cut another piece of fabric for this upper front midriff section! At this point, I am measuring to be sure there is enough left to cut a skirt! There was...
So, I folded out the corrected dart on the pattern and cut the new piece. Now, HOW am I gonna do this...since the midriff was initially formed by sewing the pleats from the top down? Basically, I had to sew a lot of it by hand.
Funny...after hand-sewing for a while, I was thinking to myself, 'this is so much more ZEN than shopping for a dress.' But I had to laugh at this thought, because only a few hours earlier I wanted to tear my hair out!
I resewed the front midriff to the front bodice. But remember? I had allowed that 1" seam allowance on the bodice that needed to be removed...ON THE BACK, TOO!
So, now I had to RIP OUT THE INVISIBLE ZIPPER and remove the excess 3/8" length on the back bodice....then resew the bodice and midriff sections and reinsert that zipper.
Eventually I got the front and back put back together with the zipper in...and it fit! Now it was time to draft the skirt...
To be continued.


No comments:
Post a Comment